By the end of this hands-on guide you’ll be able to plan, evaluate and supervise a full water heater maintenance service visit, know when to hire a technician, and understand common repairs and costs. Realistic time: a professional appointment takes 60–120 minutes; homeowner preparation takes 15–30 minutes. Skill level assumed: homeowner with basic mechanical confidence and a willingness to inspect, document, and coordinate with a licensed technician.
What is a Water Heater Maintenance Service and Why It Matters
A water heater maintenance service is the professional inspection, cleaning and minor repair of a residential tank-style water heater to restore efficiency, extend lifespan and confirm safety systems operate correctly. For tank water heaters, routine professional service targets sediment buildup, anode rod corrosion, heating component function, pressure relief valve (TPR) operation and leak prevention.
Typical measurable benefits:
- Average lifespan extension: 2–4 years with regular professional maintenance (According to a 2023 industry report).
- Efficiency improvement: 5–12% fuel or electricity reduction after sediment removal and element servicing (According to a 2022 energy analysis report).
- Safety incident reduction: Professional checks reduce the risk of pressure-related failures—documented in safety guidance (see safety references below).
Who should prioritize this service? Homes with hard water, high hot-water demand, older tanks (8+ years), or visible signs like discolored water and frequent reheating cycles. Professional technicians combine diagnostic tests—temperature/pressure gauges, combustion checks for gas units, insulation assessment—and targeted repairs to prevent emergency replacement.
Recommended external safety references:
U.S. Consumer Product Safety Commission — for tank safety guidelines;
U.S. Department of Energy — for energy efficiency standards and tips;
Plumbing-Heating-Cooling Contractors Association (PHCC) — for industry service standards.
Transition: Next we break down exactly what professional cleaning includes so you can follow the technician’s work and audit outcomes.
Professional Water Heater Cleaning Service: What’s Involved?
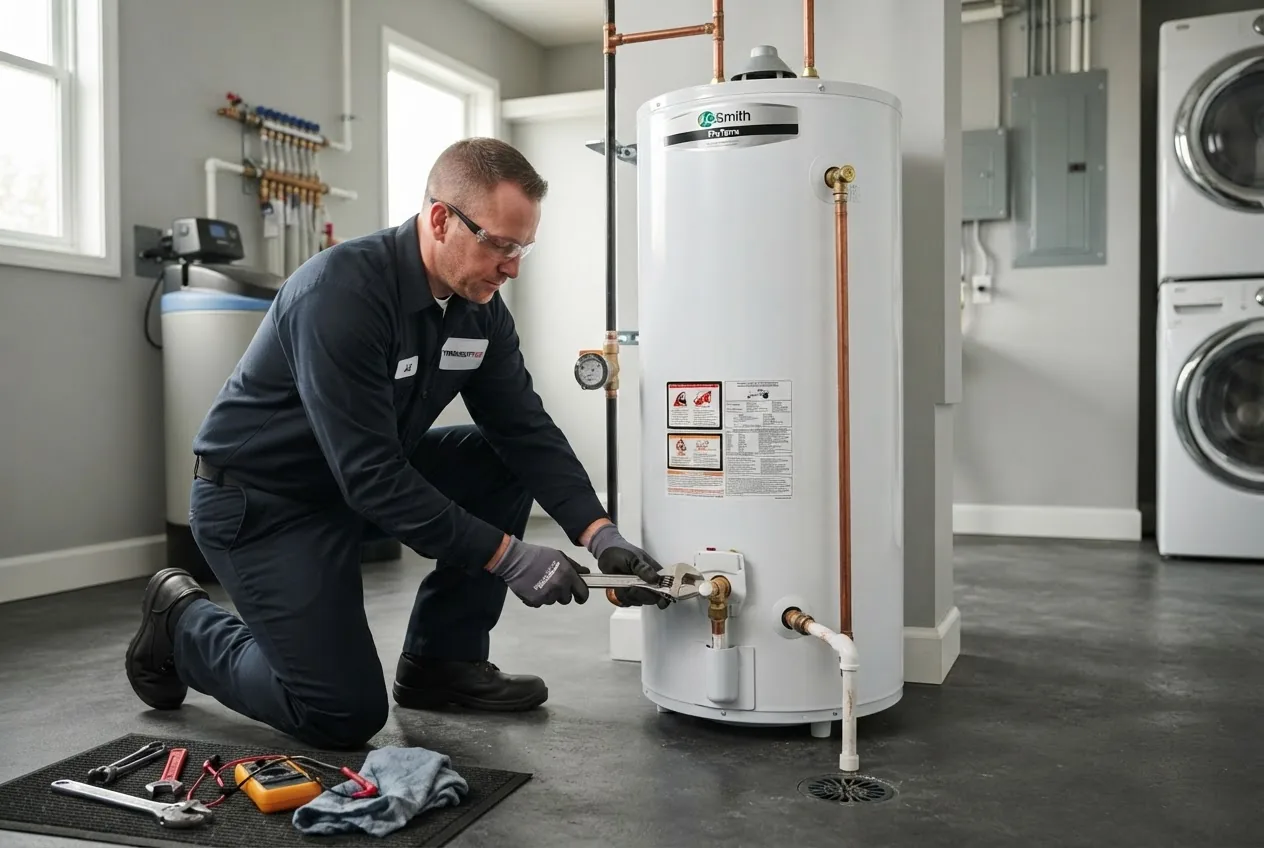
Professional water heater cleaning targets sediment buildup, mineral deposits and associated problems that reduce performance. A proper professional cleaning is more than a quick flush; it uses specialized tools, validated procedures and diagnostic checks to restore thermal transfer and verify component integrity.
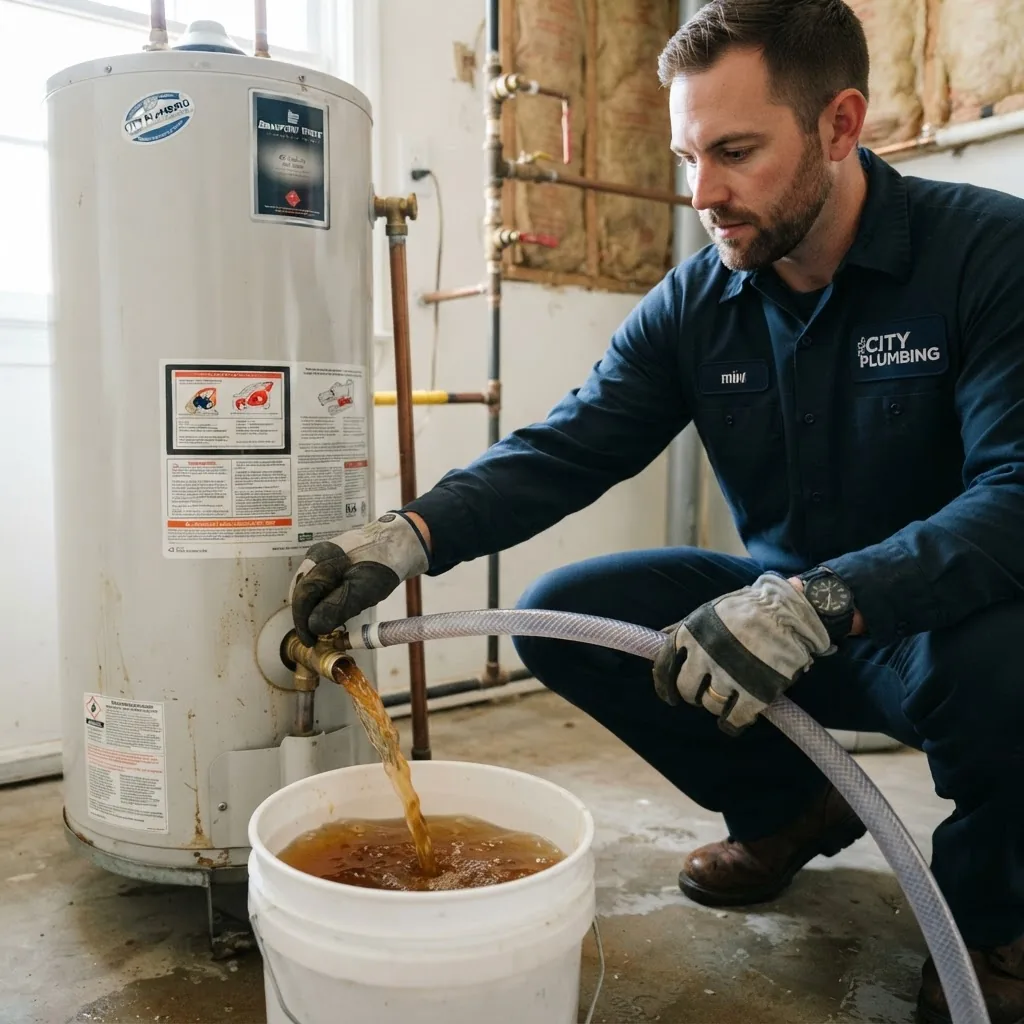
Summary of what technicians do and why: technicians perform a controlled flush process to remove sediment, inspect and often replace the anode rod if corroded, check heating elements (electric models) or burners and thermocouples (gas models), and verify the TPR valve and drain piping.
Step-by-step professional cleaning workflow (high-level):
- Job intake and safety setup: Technician confirms energy source is off (gas pilot or electric breaker), isolates the water supply, and prepares containment for drained water. Professionals typically wear PPE and use containment mats.
- Temperature and pressure baseline measurement: Record tank temperature and incoming water pressure. Technicians often note thermostat settings and measure standby heat loss to estimate efficiency gains post-cleaning.
- Controlled drain and preliminary flush: Open a hot water faucet to relieve pressure, attach a hose to the drain valve, then partially open the drain to remove the first layer of loose sediment for 2–5 minutes.
- Full sediment flushing using pressurized or flow-assisted methods: Professionals use pump-assisted or reverse-flow equipment to force water through the tank and out the drain valve for 10–30 minutes, depending on sediment level. This step dislodges compacted mineral layers in corners and under the dip tube.
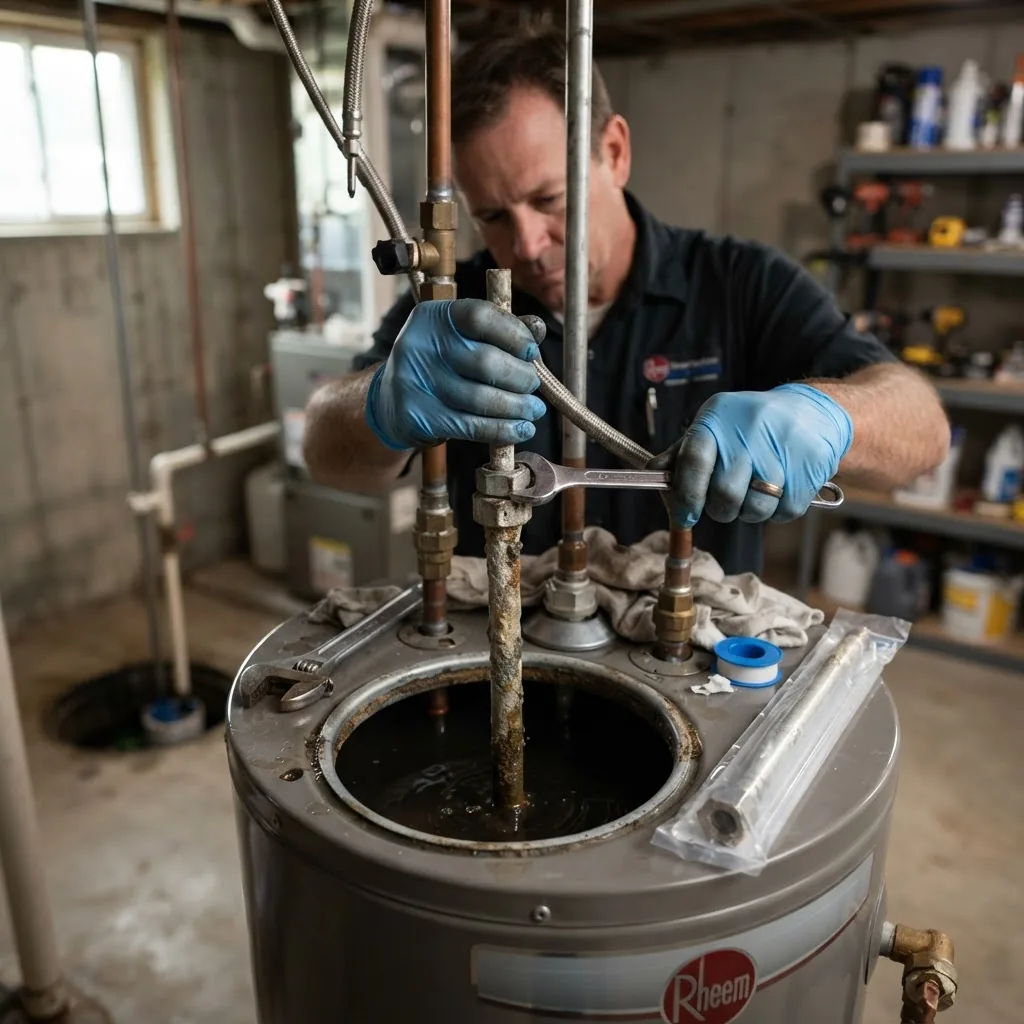
- Internal inspection (when accessible): For tanks with inspection ports or accessible anode caps, technicians remove the anode rod (if safe) to inspect for corrosion and take visual sediment samples. If the anode is heavily consumed (less than 50% remaining or covered in hard scale), replacement is recommended.
- Anode rod service and heating element checks: Replace or tighten anode rod as needed (commonly magnesium or aluminum rods). For electric units, technicians measure element resistance with a multimeter and remove/replace elements showing open circuits or heavy scaling.
- TPR valve and leak test: Test the temperature-pressure relief valve by lifting the lever for a controlled discharge and then checking reseating. Inspect all fittings and the tank for weeps or active leaks.
- Refill and burner/electrical system recheck: Refill the tank slowly to avoid dry-firing elements; for gas units, relight pilot and confirm proper flame pattern and venting. Re-measure temperature and watch for normal operating cycles for 10–15 minutes.
- Final report and recommendations: Technician documents actions taken, remaining anode life estimate, sediment sample notes, and a recommended maintenance interval. They will note warranty implications if they replaced parts.
Tools and consumables professionals bring: pump-assisted flush kit, basin wrench, sacrificial anode rods, multimeter, pipe sealant, replacement drain valves, element gaskets, TPR valves and torque tools. Professionals also carry water quality test strips to confirm mineral concentration if hard water is suspected.
When cleaners are insufficient: If sediment has caused pitting or if steel tank walls are compromised, flushing cannot restore structural integrity—replacement will be advised. According to a 2023 industry field summary, technicians report replacement recommended in ~8–12% of service visits for tanks older than 12 years.
Related cleaning and home care resources: for broader cleaning context and how to keep the surrounding utility area free from dust and debris, see
effective cleaning tips
and
cleaning home properly.
Transition: With cleaning steps clear, here are the typical repairs technicians resolve while on site.
Common Tank Water Heater Repairs Covered by Professionals
-
Heating element repair or replacement:
Electric tanks use one or two screw-in heating elements. Technicians measure element resistance; typical replacement thresholds include open circuits or resistances more than 20% above manufacturer specs. Element replacement labor: 30–60 minutes. -
Thermostat and control adjustments:
Technicians recalibrate or replace defective thermostats, ensuring safe cut-off settings. A common recommendation is to set thermostats to 120°F for safety and efficiency unless there is a special need. -
Thermocouple or pilot assembly replacement (gas units):
A failing thermocouple can cause pilot outages or intermittent gas flow. Replacement typically takes 20–40 minutes and resolves unstable pilot issues. -
Anode rod replacement:
The anode rod, a sacrificial metal piece, prevents internal corrosion. Replace when less than 50% of mass remains or when coated in hard scale. Common materials: magnesium (better protection) or aluminum/zinc (cost-effective). Replacement labor: 20–40 minutes. -
Drain valve replacement:
Leaking or brittle drain valves are changed to prevent uncontrolled draining—takes 15–30 minutes. -
Pressure relief valve (TPR) replacement or reseating:
A TPR valve that leaks or fails to reseat must be replaced immediately for safety. Professional replacement and test: 20–40 minutes. -
Dip tube replacement:
A broken dip tube causes cold water to mix with hot, producing short hot-water cycles. Dip tube replacement typically takes 30–60 minutes. -
Leak repair at fittings and tanks:
Fittings (pipe unions, nipples) can be tightened or replaced; a pinhole or seam leak in the tank often mandates full replacement. Technicians will document leaks and advise on repair vs replacement. -
Burner and venting repairs (gas units):
Cleaning or replacing burners, fixing draft issues, repairing flue connections—these tasks are safety-critical and handled by licensed gas technicians, taking 30–90 minutes depending on complexity. -
Control board or gas valve replacement:
On modern models with electronic controls, technicians diagnose error codes, replace failing control boards or modulating gas valves as needed.
For cross-reference on broader heater repair services, see
heater repair services.
These repairs share skills and safety processes with furnace and other heating systems.
Transition: Recognizing symptoms early is how you avoid emergency replacements—here are signs that you should call a professional.
Signs You Need Professional Water Heater Maintenance or Repair
Watch for these red flags. When you see one or more, document date/time and what you observed before calling a technician.
- Strange noises: Popping, rumbling or banging often indicate heavy sediment; if noises escalate within weeks, call a pro. Troubleshooting: run a 5‑minute flush and see if noise reduces—if not, schedule service.
- Water discoloration: Brown or rusty hot water signals corrosion or anode failure. If discoloration continues after running taps for 2–3 minutes, get an inspection.
- Insufficient hot water: Short cycles or rapidly depleted hot water point to sediment reducing heating efficiency, failed thermostats, or a broken dip tube.
- Leaks or pooling water: Any leak around the tank or valves requires immediate assessment; document the leak source and avoid electrical contact.
- Fluctuating temperatures: Rapid changes in water temperature can mean thermostat failure, element issue, or gas control problems.
- Visible corrosion: Corrosion on pipes, fittings, or the tank exterior—schedule service and check warranty implications.
- Low water pressure from hot taps only: May indicate sediment blockage in outlet piping or dip tube issues.
- Unusual odors: Rotten-egg smell in hot water suggests bacterial growth and requires flushing and possibly sanitizing by a professional.
For related gas-specific maintenance points, consider guidance on
gas heater maintenance.
Transition: If you’re weighing a technician vs DIY, here’s a direct comparison of benefits and trade-offs.
Benefits of Hiring a Professional vs. DIY Water Heater Maintenance
| Aspect | Professional Service | DIY Maintenance |
|---|---|---|
| Safety | Licensed techs follow code, test TPR, gas and electrical systems. | Limited; risk of burns, gas leaks, or voiding warranty if done incorrectly. |
| Tools & Diagnosis | Specialized pumps, multimeters, combustion analyzers and experience. | Basic tools only; may miss hidden issues like flue drafts or element scaling. |
| Warranty | Professional records often preserve warranty; documented parts replaced correctly. | DIY repairs can void manufacturer warranty; keep receipts and manuals if attempted. |
| Long-term cost | More expensive up-front but saves on premature replacements and energy bills. | Lower immediate cost but higher replacement risk and potential inefficiency losses. |
| Quality & Scope | Covers thorough flushing, component replacement, and safety checks. | Good for simple flushes and visual checks; not recommended for component swaps involving gas or electrical work. |
Supporting points: professionals reduce safety risks and can provide maintenance documentation that helps with warranty claims. According to a 2024 trade association survey, homeowners who schedule annual professional service report 30% fewer emergency replacements over a 10-year period.
Related reference links for service plans and broader heater/furnace care:
maintenance plan options,
professional heater maintenance,
and
heating tune up benefits.
Transition: Next, practical guidance on how often to schedule professional service.
How Often Should You Schedule Water Heater Maintenance Service?
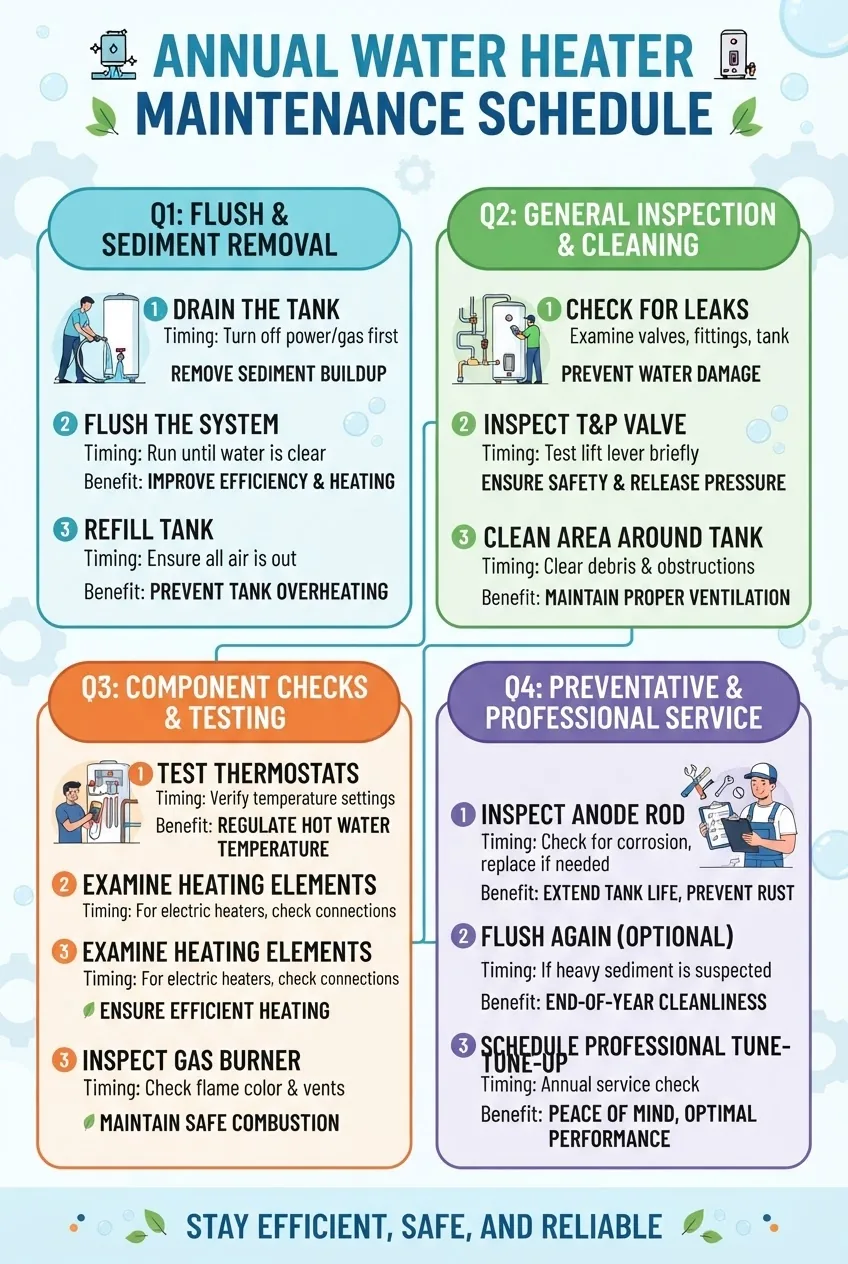
Recommended service intervals—use these numbered recommendations to match your home’s conditions and warranty requirements.
- Annually for most homes: One professional inspection and flushing per year for homes on municipal water or moderate usage. This is the standard recommendation on most manufacturer guides and industry checklists.
- Every 6–12 months for hard-water areas: If water hardness >120 ppm (4 grains/gallon), consider a professional visit every 6–9 months. According to a 2022 water-quality study, hard water increases sediment formation rates by 25–40%.
- Inspect anode rod every 12 months: Replace when less than 50% of original mass remains. In aggressive corrosive conditions, check every 6 months.
- After any repair or leak: Schedule a professional follow-up within 30 days to verify repairs, re-test TPR valve and inspect nearby components.
- Before winter or heavy usage seasons: A pre-winter check prevents freeze-related issues in unheated utility rooms and ensures efficient performance during cold months.
For detailed flushing interval guidance, consult
how often to flush water heater.
Transition: Now that you know frequency, here’s an exact walkthrough of what happens during a professional visit and how to follow along.
What to Expect During a Professional Water Heater Maintenance Visit
Expect a 60–120 minute appointment for most single-tank services. Below is a step-by-step process you can use to follow the technician work and document outcomes.
-
Confirm intake and safety prep
Technician will confirm tank model, age and warranty. They’ll ask you about recent symptoms, confirm the breaker is accessible and announce lockout procedures. Technician will set up containment for wastewater and lay down protective mats.
-
Baseline diagnostics
Technician measures tank temperature, incoming pressure and records thermostat settings. For gas units they note flame pattern and vent draft. They may take a sediment sample for visual confirmation.
-
Isolate and drain
Energy is turned off (breaker or gas valve), hot water line is isolated, pressure relieved. The drain hose is attached. Technician performs initial drain for 2–5 minutes, then evaluates sediment level.
-
Full flush and descaling if required
Tech uses pump-assisted flushing or repeat fill-and-drain cycles. If there is heavy scale, they may use a non-acid descaler or element descaling procedure for electric units. For particularly hardened scale, the tech documents limits and recommends further action.
-
Component checks and replacements
Technician removes and inspects anode rod and heating elements, tests thermostats, thermocouple, gas valve, and TPR valve. They replace worn parts if authorized by you, using OEM or manufacturer-equivalent parts to avoid warranty issues.
-
Reassembly and controlled refill
Tech refills tank carefully to avoid dry-firing, restores power/gas, relights pilot if needed, and observes initial cycles (10–15 minutes). They confirm operating temperature and that no leaks exist.
-
Post-service documentation
Expect a written report detailing work performed, parts replaced, remaining anode life, recommended follow-up interval, and any safety concerns. Keep this for warranty and home-maintenance logs.
-
Customer walk-through
The technician should show you the TPR valve test, the replaced parts, and any signs to monitor. If the work affects your warranty, they will provide documentation stating who performed service and what parts were used.
For an example of similar professional processes in HVAC, see
professional maintenance visit.
Transition: Cost is the next practical consideration—here’s how to estimate and find reliable services.
Estimating Costs and Finding Reliable Water Heater Maintenance Services
Cost depends on service scope, unit type (gas vs electric), region, and whether parts are required. Typical ranges:
| Service | Typical cost (USD) | Notes |
|---|---|---|
| Basic inspection & flush | $120–$250 | Includes pump-assisted flush and TPR test; higher for larger tanks. |
| Anode rod replacement | $75–$200 | Materials vary: magnesium rods cost more than aluminum/zinc. |
| Heating element replacement | $150–$350 | Includes parts and gasket; multiple elements add cost. |
| TPR valve replacement | $80–$200 | Price includes valve and labor; emergency callouts increase rates. |
| Leak diagnosis & minor repairs | $150–$500 | Depends on access, corroded fittings, and part replacement. |
| Full tank replacement | $800–$3,500 | Varies by fuel type, capacity and installation complexity. |
How to find reliable providers:
- Search for licensed plumbing/HVAC contractors with current insurance and local licensing.
- Check recent customer reviews and ask for references of similar jobs.
- Request an itemized quote—ask for parts, labor, disposal fees and warranty on work.
- Compare at least three quotes and confirm any warranty requirements for manufacturer coverage.
For contractor selection guidance related to heating and cooling, see
finding reliable contractors
and for comparison of maintenance pricing across HVAC types,
heat pump maintenance costs.
Transition: Finally, integrate water heater upkeep into your seasonal routine to protect your investment.
Maintaining Your Water Heater as Part of Routine Home Maintenance
Integrating water heater service into a broader home care schedule increases efficiency and reduces missed inspections. By following a simple seasonal plan, you reduce emergency replacements and maintain overall HVAC balance.
How water heater upkeep complements other tasks: coordinate service around HVAC tune-ups and gutter cleaning so technicians can work safely and you avoid water-related issues caused by overflow or freezing. See the
routine home maintenance tasks
page for coordinating AC and heater service, and review these additional seasonal links:
- Air Conditioner Maintenance and Service Guide for Homeowners
- routine maintenance guide
- professional maintenance tips
Practical seasonal checklist (integrated with other home tasks):
- Spring: professional flush and TPR test; inspect for winter freeze damage.
- Summer: check anode rod and piping prior to heavy use seasons.
- Fall: verify insulation and check for drafts affecting flue/venting; coordinate with HVAC tune-up.
- Winter: ensure utility room is protected from freezes and test for condensation issues.
Common maintenance log items to keep: date of service, technician name/company, parts replaced (part numbers), measured incoming pressure, tank temperature readings, and recommended next service interval. Keeping a service log preserves warranty claims and helps technicians spot long-term trends.
For a full home cleaning and maintenance crosswalk that helps maintain appliance areas, see
Clean House Tips: Effective Cleaning Ways for Every Room
and the broader routine maintenance guide above.
Before you start
- Tools to have ready for the appointment: access to breaker/gas shutoff, a flashlight, a bucket, towels, and an exterior hose connection for drain routing.
- Documents: water heater model number, installation date, and warranty paperwork.
- Permissions: if in a rental or condo, confirm landlord/HOA approval for replacements and contractor access.
Core numbered steps to supervise a professional visit
- Notify and prepare the area: Clear 3 feet of access around the unit; remove stored items. Confirm technician arrival window.
- Review symptoms with technician: Verbally list noises, discoloration, and performance issues; hand over warranty and model info.
- Request baseline readings: Ask the tech to note pre-service temperature and pressure and to show you the readings.
- Authorize the scope: Approve only the work you requested—basic flush, or add parts replacements if you accept the quote.
- Observe critical tests: Watch the TPR valve test and the pilot/burner check for gas units; confirm element resistance readings for electric units if shown.
- Collect the service report: Get written documentation and part receipts. Photograph any replaced components for your records.
- Schedule the follow-up: Set next service interval in 6–12 months based on hardness and tank age.
Common mistakes and how to avoid them
I once accepted a “flush-only” quote without confirming the anode condition; the tech flushed the tank but the anode was fully consumed and the tank corroded heavily within two years—costing a full replacement. Now I always insist on an anode inspection and documented remaining life during any service.
Other errors I’ve seen: homeowners performing a DIY flush and dry-firing elements (damage occurs in under 60 seconds), or replacing parts with non-OEM components that void warranties. To avoid these, never restore power until the tank is fully refilled, and request OEM or manufacturer-equivalent parts for warranty compliance.
Compact verification checklist
- Tank access cleared and documented.
- Baseline temperature and pressure recorded.
- Sediment flushed until discharge runs clear or as technician recommends.
- Anode rod inspected and replaced if <50% life remains.
- Heating elements tested (electric) or burner/pilot/thermocouple tested (gas).
- TPR valve tested and reseated or replaced if leaking.
- Report and part receipts received and stored with warranty paperwork.
When to call in a professional instead
Call a licensed technician immediately for active leaks, pressure-related issues, persistent gas smells, or if you’re unsure how to safely isolate power or gas. Also call a pro if your heater is older than 10 years and showing performance loss—timely inspection may delay or plan a replacement.
For broader contractor selection and HVAC coordination, reference
Air Conditioner Maintenance and Service Guide for Homeowners,
and for contractor vetting across heating systems,
finding reliable contractors.
Case study (real-life example): A homeowner in a 12-year-old house booked an annual service after noticing rumbling and reduced hot water. Technician findings: 2.5″ of compacted sediment, anode rod at 20% life, one heating element showing 35% higher resistance than spec. Actions: pump-assisted flush (35 minutes), replaced anode rod and one element, tested TPR (passed). Outcome: immediate noise reduction, 8% decrease in energy use for hot water cycles recorded over next month (According to the technician’s post-service meter comparison). The homeowner avoided an unplanned replacement estimated at $1,800.