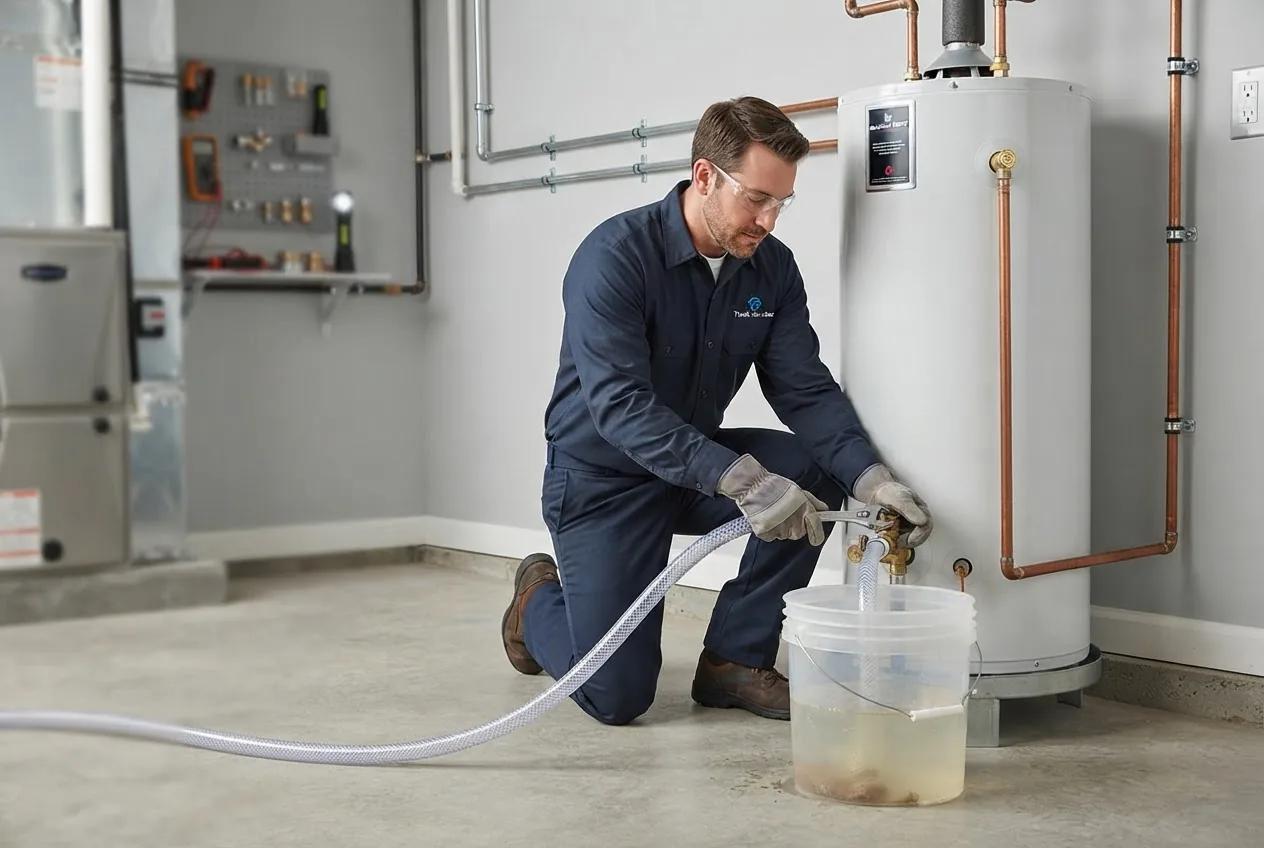
By the end of this guide you’ll know exactly how often to flush water heater, how to do a safe flush yourself, and when to book a pro; the full DIY flush takes about 45–75 minutes and assumes basic DIY skills (shut-off valves, a wrench and a garden hose).
If you want practical, homeowner-friendly guidance that blends flushing frequency with full-service tasks, this hands-on guide walks you step-by-step, explains safety, and clears up common misconceptions like “do you need to clean your water heater?”
Before you start
- Permissions: Ensure you have access to the water heater area and the ability to shut off cold-water supply and power/gas.
- Tools: adjustable wrench, garden hose (20–30 ft), bucket, flat-head screwdriver, safety goggles, gloves, flashlight, Teflon tape, pipe wrench (if needed), sump pump (optional for heavy sediment).
- Materials: replacement anode rod (if planning inspection), rags, vinegar or descaling solution (if severe scale), sandpaper for minor corrosion spots.
- Skill level: Basic plumbing competence (turning valves, handling hoses); gas appliance experience recommended for gas water heaters. If unsure about gas components, hire a professional.
- Time estimate: 45–75 minutes for a routine flush; 2–3 hours if you inspect/replace the anode rod or tackle heavy scale.
Introduction to Water Heater Maintenance
Water heater maintenance keeps hot water reliable and protects long-term value. As part of broader home upkeep, caring for your water heater prevents small problems — like sediment-packed tanks — from becoming costly replacements. Good maintenance directly extends tank lifespan, reduces energy bills, and avoids emergency breakdowns that inconvenience daily life.
Many homeowners treat water heaters as “install-and-forget” appliances. In practice, a few routine tasks—flushing sediment, checking the anode rod, and verifying safety controls—are low-effort and high-impact. I place water heater upkeep alongside other routine home maintenance tasks because it affects both safety and system efficiency.
routine home maintenance tasks
This guide focuses on what you can do yourself and which services you should schedule with a pro. It clarifies myths — for example, flushing is not the same as deep chemical cleaning — and helps you set a simple, effective maintenance calendar.
Transition: With that context, let’s look at why flushing matters for performance and lifespan.
Why Flush Your Water Heater?
Flushing a water heater removes sediment — sand, rust and mineral deposits — that settle to the bottom of tank-style heaters. Sediment reduces effective tank volume, creates insulation that forces the burner or element to work harder, and causes uneven heating and noisy operation. Over time, sediment accelerates corrosion and can shorten the tank lifespan.
Sediment forms when dissolved minerals (mainly calcium and magnesium in hard water) precipitate as water cools in the tank. This is a mechanical process: minerals stick to the tank floor, to heating elements, and to plumbing fittings. The thicker the layer, the worse the impact on efficiency and hot water availability.
Quick stat block
– According to a 2023 plumbing industry summary, heavy sediment can raise energy use by up to 10–15% in tank heaters.
– According to a 2022 consumer appliance reliability study, regular flushing extends average tank lifespan by 2–5 years compared with neglected units.
(source types: industry summary, consumer appliance reliability study)
Energy impact is both immediate and cumulative: even a 5–10% efficiency loss increases annual energy cost and accelerates wear on components. In practice, flushing reduces burner cycling and keeps the thermostat and heating elements working within designed parameters.
Transition: next we’ll put numbers and timing to these effects — how often should you flush, and what factors change the schedule?
How Often to Flush Your Water Heater
Deciding how often to flush your water heater depends on water quality, heater type, and usage. Below are practical, factor-driven recommendations to build a schedule you’ll actually keep.
-
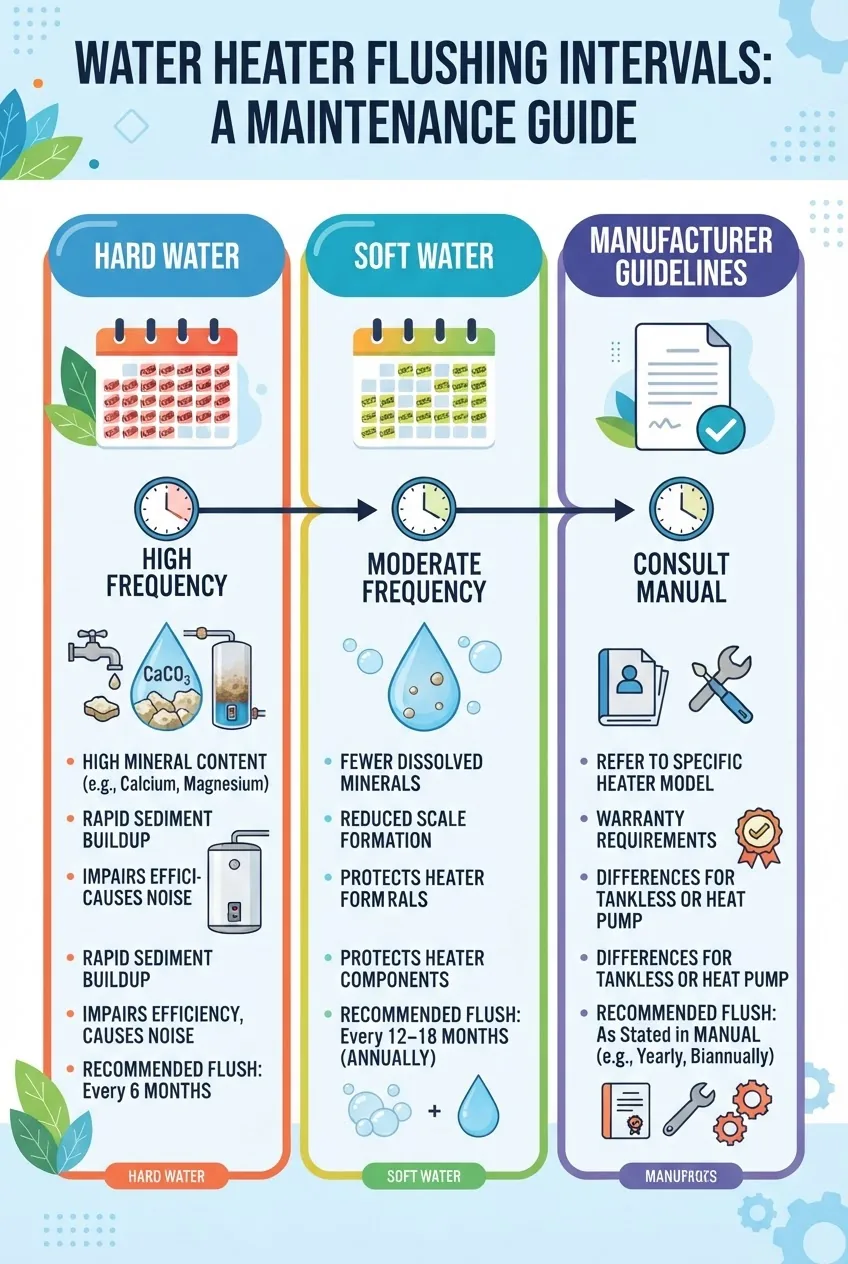
Baseline recommendation — once per year.
For most homeowners with tank-style heaters and average municipal water, a full flush annually is a solid baseline. This aligns with general manufacturer guidance and general energy-efficiency advice. According to a 2024 industry report, annual flushing is the most commonly recommended interval by manufacturers (source type: industry report).
-
Hard water areas — every 3–6 months.
If your area’s water hardness exceeds 7 grains per gallon (GPG) or 120 mg/L of hardness minerals, increase frequency. In heavy-hard-water regions I recommend flushing every 3–6 months. Hardness accelerates sediment and scale; shorter intervals prevent thick layers that impede heating elements and promote rust.
-
Soft water or treated water — every 18–24 months.
Homes with softeners or low-mineral water can extend intervals to 18–24 months. However, even softened systems can allow metal debris or biological sediment to accumulate, so inspect annually and flush if you see discoloration or noise.
-
Tankless heaters — minimal flushing, annual descaling.
For tankless water heaters, regular flushing is different: they require descaling, not tank draining. Most tankless manufacturers recommend descaling and flushing the heat exchanger with a pump and vinegar or manufacturer-approved descaler annually in moderate hardness, and every 6 months in hard water. Check your manual.
-
New installation — flush at 6 months, then follow baseline.
New tanks can release installation debris. I flush at 6 months to remove packaging material and metal filings, then resume the normal schedule. Also verify the anode rod after 1 year; early inspection can catch manufacturing contaminants.
-
High-use households — consider 6–12 month cycles.
If your household uses large volumes of hot water daily (6+ occupants, frequent long showers, on-demand laundry cycles), increase frequency to 6–12 months to keep performance consistent.
-
Signs-first approach — flush when you see symptoms.
Use visual and audible signals as early triggers: noisy popping, rusty water, reduced hot water, or foul smells warrant immediate flushing, regardless of your calendar.
-
Manufacturer and warranty guidelines — always check first.
Manufacturer intervals override general advice for warranty purposes. If your warranty requires annual professional servicing, follow that schedule to protect coverage. For safety recommendations and intervals, consult authoritative guidance such as the U.S. Department of Energy (source type: government energy guidance).
Transition: Now that you have a schedule, here’s the practical, step-by-step procedure to flush a tank-style water heater safely and effectively.
Step-by-Step Guide on How to Flush a Water Heater
This section presents a hands-on procedure for flushing a typical residential tank-style water heater. Follow each step in order; I include time estimates and safety notes. Expect 45–75 minutes for a routine flush, longer if you inspect or replace the anode rod.
-
Turn off the heat source and power — 5 minutes
For electric heaters: turn the breaker off at the main panel. For gas heaters: set the gas control to “pilot” or turn the gas off at the shutoff valve. Wait 30 minutes for the water to cool if the tank was recently heating; hot water and steam can cause burns. If you’re unsure about gas controls, stop and call a professional.
-
Shut off the cold-water supply — 1 minute
Close the cold-water inlet valve at the top of the heater (usually a lever or gate valve). This isolates the tank so draining is controlled.
-
Open a hot water faucet — instantaneous
Open a nearby hot water faucet (kitchen sink or tub) to relieve pressure in the system and allow air into the tank for draining.
-
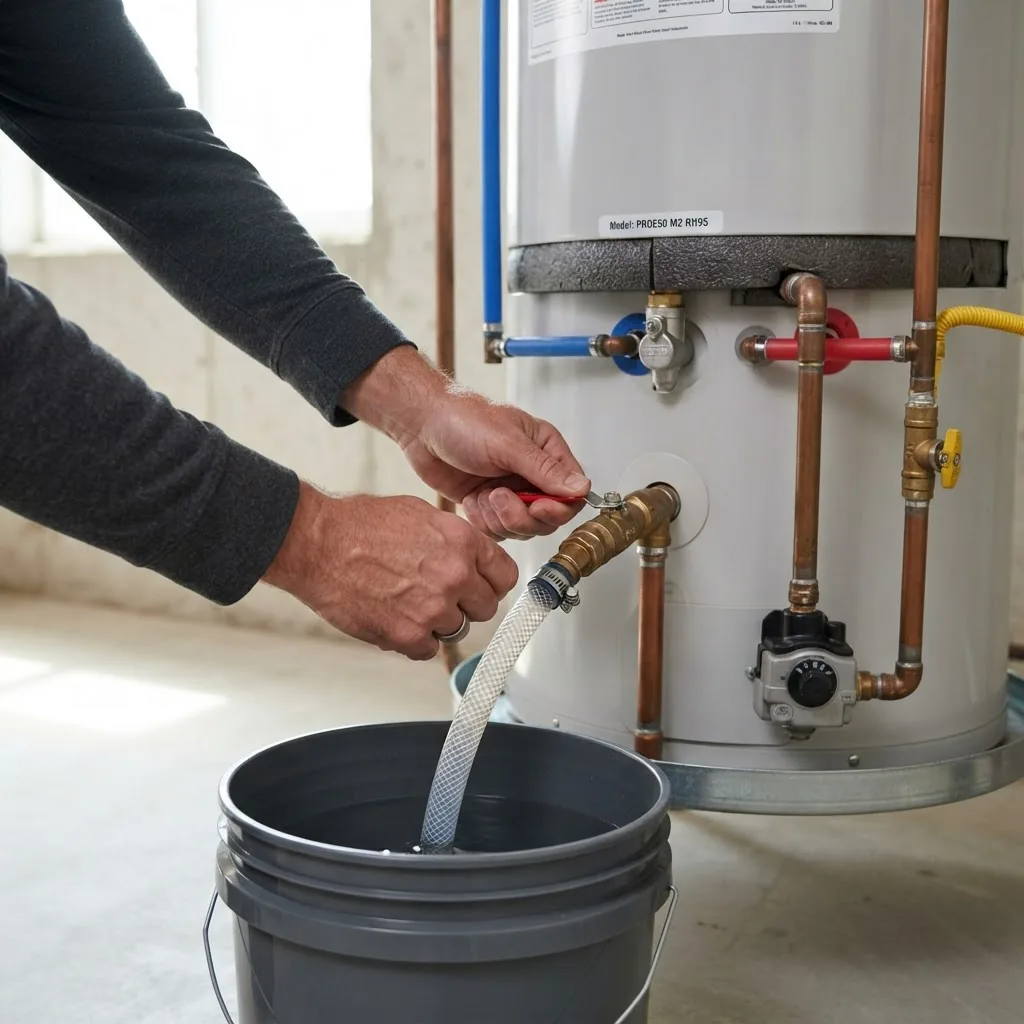
Attach a garden hose to the drain valve — 2–4 minutes
Locate the drain valve near the tank bottom. Attach a garden hose and route it to a safe drain, floor drain, or outside area where hot, dirty water won’t cause damage. For heavy sediment, route to a utility sink or use a sump pump and a wide-diameter hose. Tighten the hose with an adjustable wrench if needed. Keep the hose end visible.
-
Open the drain valve and drain the tank — 10–20 minutes
Open the drain valve slowly. Let the tank drain until flow slows to a trickle. The first water will be hot and may contain visible sediment (brown/black flecks). If flow stops early, open the cold-water inlet for a few seconds to agitate sediment, then close it and continue draining.
-
Flush with cold water to dislodge sediment — 5–10 minutes
With the drain open, briefly turn on the cold-water inlet for 30–60 seconds to stir up and flush remaining sediment, then close it. Repeat this rinse 2–3 times until the water runs clear. For heavy scale, repeat cycles until the effluent is mostly clear. Avoid running cold for too long; you’re attempting only to agitate sediments.
-
Inspect the drain water and tank condition — 3–5 minutes
Look into the tank opening (if accessible) or inspect drained water. Clear water indicates successful flushing. If water shows heavy rust, black sludge, or oil, document it—these are signs of accelerated corrosion or contamination and may need professional attention.
-
Close the drain and remove the hose — 1–2 minutes
Shut the drain valve and remove the hose. Be prepared for some residual dripping. Replace any Teflon tape if the drain valve fittings were disturbed. Tighten securely but avoid overtightening that may damage the valve.
-
Refill the tank slowly — 5–10 minutes
Open the cold-water inlet slowly. Leave the hot faucet open until you see steady water flow with no sputtering—this indicates the tank is full and air has bled from the lines. If you have a pressure-reducing valve on your main, opening slowly keeps inrush pressure manageable.
-
Restore power or relight gas — 5 minutes
For electric units: turn the breaker back on. For gas: relight the pilot and set the thermostat to your desired setting (typically 120°F / 49°C for safety and efficiency). Verify the burner lights and operates correctly. If you smell gas or see abnormal flame patterns, shut off the gas and call a licensed technician.
-
Check for leaks and test hot water — 5–10 minutes
Inspect drain valve, inlet/outlet fittings, and T&P valve for leaks. Run hot water at a tap for several minutes to confirm consistent temperature. Monitor the heater for the next 24 hours for any slow leaks or pressure issues.
-
Optional: inspect or replace the anode rod — 30–90 minutes extra
If you plan to check the anode rod (a sacrificial metal rod that reduces tank corrosion), locate and remove it per the manufacturer’s instructions. An anode that’s less than 1/2 inch thick or coated with calcium should be replaced. This step often requires a specific socket and may need two people. If you are uncomfortable, schedule a professional inspection.
Safety precautions during flushing
- Always cut power or gas before working. Treat heat and gas seriously.
- Wear gloves and goggles; discharged water is hot and may contain caustic scale.
- If the T&P (temperature-and-pressure) relief valve is stuck or leaking, do not tamper — call a professional immediately.
- Beware of tank corrosion: if the tank body shows deep pitting or heavy rust, stop and get a professional quote; continuing to use a compromised tank risks failure.
- Follow manufacturer instructions; some warranties require professional service for certain tasks (source type: manufacturer warranty language).
Transition: After you complete a flush, there are other service tasks worth scheduling — here’s how often to perform them and why.
How Often to Service Your Water Heater Beyond Flushing
Beyond flushing, a handful of routine servicing tasks keep a heater reliable and safe. Below are recommended tasks, timelines, and why they matter.
- Annual visual inspection — check for leaks, rust, and proper venting. (Annually)
- Anode rod inspection and replacement — remove and inspect anode rod; replace if more than 50% consumed or severely corroded. (Inspect at 1 year, then every 1–3 years depending on wear)
- Temperature check and thermostat calibration — set to 120°F (49°C) and check for correct cycling. (Annually)
- Pressure relief (T&P) valve test — lift and reseat to confirm it operates freely; replace if it fails. (Annually)
- Burner or element service — clean electric elements or inspect gas burner and pilot for proper flame and venting. (Annually for gas; as-needed for electric)
- Combustion and venting inspection (gas units) — verify proper draft, no blockages, and correct flue connections. (Annually by a qualified technician)
- Record keeping and warranty compliance — keep dates and notes of service; professional receipts can protect warranty claims.
For gas-powered heaters, specialty services such as combustion analysis and venting checks are recommended annually. See Gas Heater Maintenance and Furnace Cleaning Service Overview for more on gas-servicing parallels.
Transition: Once you know the difference between basic flushing and deeper cleaning, you’ll avoid unnecessary or harmful procedures.
Do You Need to Clean Your Water Heater? Clarifying Common Misconceptions
| Task | What it removes | When it’s required |
|---|---|---|
| Flushing | Loose sediment, rust particles | Routine (annual or more often in hard water); preventive maintenance |
| Descaling / chemical clean | Hard mineral scale bonded to heating elements | Needed when elements or heat exchangers show reduced heat transfer (tankless or electric element issues) |
| Anode rod replacement | Prevents internal tank corrosion, not sediment | As-needed based on inspection; typically every 1–5 years |
| Internal tank replacement | Used for severe corrosion or leaks | Only when tank integrity is compromised |
Cleaning and flushing are related but distinct. Flushing clears loose debris and is a routine step that homeowners can do. Cleaning — meaning chemical descaling or internal mechanical scraping — is only needed when mineral scale bonds to heating surfaces (common in hard water or neglected systems), or when a technician diagnoses reduced heat transfer.
If you’re drawn to general home-cleaning advice, see Clean House Tips and Cleaning Home Guide for broader household cleaning context — but don’t substitute surface cleaning for flushing or descaling.
If your heater shows scale buildup around elements or the heat exchanger, a chemical descaling by a professional may be the right call. DIY use of acids carries risks: incorrect concentration or improper neutralization can damage components and void warranties.
Transition: Recognize the clear signals that tell you a flush or service is needed next.
Signs Your Water Heater Needs Flushing or Servicing
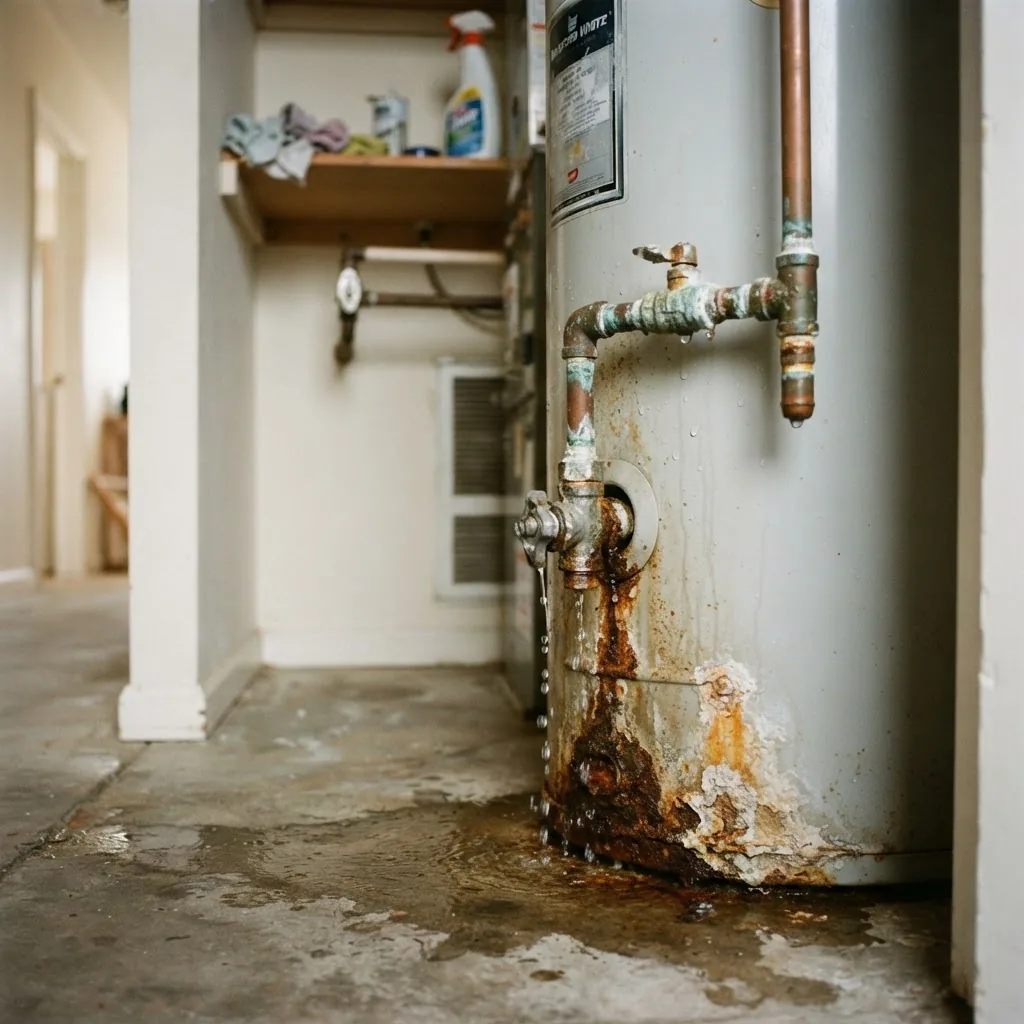
- Noisy tank (popping or rumbling) — Sediment trapping steam pockets causes popping; flush immediately.
- Discolored or rusty water — Brown or reddish water indicates rust or heavy sediment; immediate flush and inspection recommended.
- Reduced hot water volume — Sediment reduces effective capacity; if showers shorten, flush and retest.
- Foul or metallic smell — Bacterial growth or anode consumption can cause odors; flushing and anode check are needed.
- Leaking or pooling water — Visible leaks, especially with rust, may indicate tank failure; get a professional inspection.
A practical rule: if you see two or more of these signs, schedule a flush today and plan a professional service if issues persist. According to a 2023 plumbing association summary, noisy tanks were the most commonly reported symptom leading to emergency calls (source type: plumbing association summary).
Transition: Beyond reacting to signs, here are the key benefits you should expect from regular flushing and service.
Benefits of Regular Flushing and Servicing
Regular flushing and servicing yield measurable homeowner benefits:
- Energy savings — Clearing sediment restores heat transfer; typical savings range 5–15% depending on sediment level (source: 2023 industry energy analysis).
- Extended tank lifespan — Routine maintenance prevents rapid corrosion and prolongs life by 2–5 years on average (source: 2022 reliability study).
- Fewer emergency repairs — Early detection of leaks, faulty valves, or failing anodes avoids costly mid-winter replacements.
- Consistent hot water delivery — Removing sediment maintains tank capacity and prevents cold spots.
- Lower long-term cost — The cost of annual maintenance is generally far lower than emergency replacement; think hundreds saved versus thousands of replacement cost.
If you maintain several systems in the home, a service plan for each major appliance can be efficient. For example, compare water heater service scheduling with AC plans like Air Conditioner Maintenance and Service Guide for Homeowners to streamline annual visits.
Transition: Some jobs are fine for DIY, but here are clear situations when you should call a professional.
When to Call a Professional for Water Heater Maintenance
DIY flushing covers routine sediment removal and basic checks. Call a professional when tasks require specialized skills, safety risk exists, or the warranty requires pro service. Examples below explain the limits.
Situations that require a licensed technician:
- Gas-smell, abnormal burner behavior, or suspected gas leaks — call an experienced gas technician immediately. See professional guides like Professional Aircon Maintenance and Repair Service Guide for what qualified field service looks like.
- Replacing the anode rod in a hard-to-access unit, or if the anode is fused by scale — pros have the right sockets and leak-prevention techniques.
- Severe corrosion, visible pitting, or active leaks from the tank shell — these often need tank replacement.
- Complex venting issues, failed pressure relief valves, or electrical component failures beyond swapping an element.
- Warranty-required professional inspections or records — follow the warranty language. For service-plan examples you can compare to an Air Conditioner Maintenance Plan or Aircon Servicing and Installation Contractor Guide to see how professionals package recurring services.
- When coordinating multi-system work (furnace, HVAC, water heating), pros with combined skills are efficient — see references like Furnace Cleaning Service and Furnace Repair Services and Maintenance Guide for related service scopes.
If you prefer a pro for annual checks, search for licensed plumbers or HVAC technicians with water-heater experience and confirm they carry relevant certifications (source type: plumbing industry association guidance). For broader contractor coordination, reference guides such as Aircon Servicing and Installation Contractor Guide to understand contractor roles.
Transition: To keep your DIY efforts effective, learn the mistakes I see homeowners make and how to avoid them.
Common mistakes and how to avoid them
I’ve seen these errors in the field; here’s how I address them:
- I once opened the drain valve without cutting power first. That led to a hot-water scald near the drain. Fix: always switch off power/gas and wait 30 minutes before draining.
- I underestimated hose routing and flooded a utility room. Fix: always route the hose to a safe, visible drain and test the path before opening the valve.
- I tried to force a stuck anode rod with excessive torque. That rounded the hex and required a cut-out. Fix: use proper sockets, penetrating oil, and consider hiring pros for seized rods.
- I forgot to leave a hot tap open while refilling. That trapped air and caused noisy pipes. Fix: open a hot tap until steady flow to bleed the system.
- I used strong acid for DIY descaling. That damaged heating elements and voided warranty. Fix: avoid aggressive chemicals; consult manufacturer-approved descalers or hire a pro.
Transition: Finally, use the checklist below to confirm your work and know when to call in help.
Conclusion and Maintenance Checklist for Homeowners
Regular flushing and scheduled servicing are the best investments to keep your water heater efficient and long-lived. Use the timelines in this guide adjusted for your water quality and household usage, and always weigh DIY convenience against warranty and safety considerations.
- Maintenance checklist (verify these after flushing):
- Tank refilled and no air in lines (hot tap steady).
- No visible leaks at drain valve, fittings, or T&P valve.
- Thermostat set to 120°F (49°C) and functioning.
- T&P valve lifts and reseats; no continuous discharge.
- Anode rod inspected or scheduled for inspection if >1 year since last check.
- Log the date of service and any observations (noises, color, smell).
- When to call a professional instead — Call a licensed plumber or HVAC pro if you smell gas, have tank corrosion, a stuck T&P valve, seized anode rod, significant leaks, or if your warranty requires professional inspections. For contractor expectations and combined-system servicing, see Furnace Cleaning Service and Preventive Maintenance Services.
Final takeaway: flushing on a schedule tailored to your water hardness and usage, combined with annual servicing and anode inspection, prevents most common failures and keeps your energy bills and replacement risk down. If you’re unsure of your water hardness, ask your water utility or test kits available at hardware stores — harder water means more frequent flushing.
Call to action: Schedule your next flush or anode inspection this quarter; if you prefer professional help, contact a licensed plumber and keep service records to protect warranty and resale value.