

Estimated replacement cost calculator — By the end of this hands-on guide you’ll have a documented rebuild estimate you can present to insurers and use to set coverage limits; expect 90–180 minutes to complete a thorough calculator run, beginner skill required with basic measurements and records.
This guide assumes you want practical, insurance-focused numbers (not contractor bids) and walks you through data collection, calculator inputs, adjustments for permits and codes, and producing a defensible number to set policy limits or request a quote.
Before you start
- Tools: tape measure, property tax record, recent mortgage/deed, digital camera, laptop/tablet with internet access.
- Documents: floor plans (if available), recent receipts for major work (roof, HVAC), property survey or lot size, local building permit history.
- Accounts: access to your insurer’s policy declarations page, or a preferred online replacement cost estimator.
- Time: set aside uninterrupted 90–180 minutes; longer if you’ll verify contractor quotes or local code upgrades.
What Is an Estimated Replacement Cost Calculator?
A replacement cost value calculator is a tool—online or software—that estimates the expense to rebuild your home from scratch at current prices for materials, labor, permits and code upgrades. It does not reflect land value or what your house would sell for; instead it models the cost to reconstruct the dwelling to the same utility and standard.
Illustrative example: a 2,000 ft² single-family home with standard finishes in a mid-cost metro might return a replacement cost of $250,000 from a calculator that uses $125/ft² base construction. That base gets adjusted for local labor, roof complexity, foundation type, permit costs and recent local inflation indices.
Common terminology clarified:
- Replacement cost: cost to rebuild the structure with similar materials and workmanship (no deduction for depreciation).
- Actual cash value: replacement cost minus depreciation (older finishes reduce payout).
- Rebuild cost: often used interchangeably with replacement cost in insurance contexts.
Calculators vary: some are free online replacement cost calculator tools that use square-foot multipliers and regional indices; advanced tools let you input roof type, number of bathrooms, finished basement and special features for a reconstruction cost estimator with higher accuracy.
Transition: Now that you know what these calculators do, let’s explain why getting this number right matters for your insurance setup.
Why Determining the Accurate Replacement Cost of Your Home Matters for Insurance
Accurate replacement cost ties directly to policy performance and your financial protection after a loss. Setting coverage too low risks underinsurance; too high and you pay unnecessary premiums. Below are clear benefits of a correct replacement cost estimate:
- Correct coverage limits — ensures insurer will cover rebuilding expenses, not just partial payouts.
- Proper premium pricing — a defensible replacement cost avoids surprises at renewal and aligns premiums with actual risk.
- Claims predictability — when a claim occurs, an up-to-date replacement estimate speeds appraisal and settlement.
- Budgeting and savings — you can plan savings or contingency funds for deductibles and out-of-pocket permit/code upgrades.
Routine upkeep also affects rebuild complexity and material condition; for a practical tie-in see Annual Maintenance Cost Guide for Home Repair and Budget.
Read the annual maintenance costs guide for how maintenance reduces unexpected replacement complexity and helps maintain replacement value.
Transition: With the “why” established, the next section is a granular, step-by-step walkthrough on how to estimate replacement cost yourself.
How to Estimate Replacement Cost of Home: Step-by-Step Guide
This section gives a hands-on sequence you can follow immediately. Each step begins with an action-first phrase. Expect to spend 90–180 minutes gathering facts and running the calculator; allow more time if you call local building officials or contractors for verification.
-
Gather basic property dimensions.
Measure or confirm the gross floor area (finished square feet) for each level. Record garage, porch, and finished basement areas separately. Example: 1st floor = 1,200 ft²; 2nd floor = 800 ft²; garage = 400 ft²; total finished living = 2,000 ft².
Tip: Use property tax records or deed measurements if you’re unsure—these usually list building area. If the house has multiple additions, record each addition’s footprint and year built.
-
Catalog building components and finish levels.
List roof type (asphalt shingle, metal, tile), exterior (vinyl, brick), interior finish quality (basic, good, premium), number of bathrooms and kitchens, basement finish percent, and special features (fireplace, pool, attached structures).
Use categories: Basic = builder-grade, Good = moderate upgrades, Premium = custom finishes. Record examples—e.g., “kitchen: quartz counters, medium cabinets”—to feed into the calculator’s finish-level toggles.
-
Collect local cost multipliers and indices.
Find your county or metro region and note a local construction cost multiplier—many calculators use an index or zip-code adjustment. If you prefer authoritative data, reference construction cost providers (e.g., RSMeans) or local builders’ associations.
According to a 2024 industry report from RSMeans (industry report), regional labor cost differences can change rebuild estimates by ±15–35% versus a national baseline.
-
Enter base cost per square foot.
Open your chosen replacement cost estimator and enter the base construction cost per square foot. If unknown, many tools default to a regional base (for example, $125/ft²). For a conservative approach, use mid-range values: low-cost areas $90–$120/ft²; mid-cost $120–$200/ft²; high-cost urban $200+/ft².
Tip: For older homes with complex carpentry or historical details, add at least 25% to the base per-square-foot value for specialized labor and materials.
-
Adjust for roof complexity and foundation type.
Roof shapes (hips, multiple gables) and steep slopes raise costs; add 5–15% for complex roofs. Foundation types—slab vs crawlspace vs full basement—affect excavation and waterproofing costs; basements finished to living standards add $35–$75/ft².
-
Include non-structural and special features.
Add line items for decks, porches, pools, attached garages, built-in cabinetry, and systems (HVAC, electrical, plumbing). Many calculators include checkboxes—use them to add fixed amounts (e.g., attached garage +$25–$40/ft² of garage).
-
Estimate permit, inspection and code-upgrade costs.
Contact your local building department or use typical permit fee estimates: small projects 0.5–1% of construction value, larger site work 1–3%. For code compliance (e.g., seismic, fire sprinklers), plan an additional $6,000–$30,000 depending on scope.
According to a 2023 US Department of Housing report (government report), code upgrade requirements have contributed to a 7–12% uplift in average rebuild costs in certain jurisdictions.
-
Adjust for inflation and contractor backlog.
Apply a construction inflation factor for the expected rebuild timeframe. Use a 12-month inflation uplift of 4–12% depending on local trends; where supply chains are tight add another 3–8% for premium pricing and scheduling delays.
Source note: Construction inflation varies—see local indices or national sources such as the Bureau of Labor Statistics for recent measures (industry data).
-
Factor in demolition and debris removal.
Demolition and site cleanup typically add $3–$12/ft² or a lump sum of $4,000–$25,000 depending on size, hazardous materials and access. If the estimate assumes “rebuild on same foundation,” verify if demolition is included or separate.
-
Run the replacement cost calculator.
Input your collected measurements, component choices and adjustments into an estimated replacement cost calculator. Use the detailed-entry mode if available—enter each room count, finish level and system ages. Record the primary output and the breakdown (materials, labor, permits, contingencies).

Case study: A homeowner in Ohio entered 2,400 ft², mid-level finishes and local multiplier +8% and received $360,000 replacement cost; after adding code upgrades (+$18,500) and demolition ($7,200), the defensible estimate used for the policy was $385,700. That homeowner increased their coverage limit to avoid a 20% underinsurance gap that would have impacted claims payout—based on a 2022 insurer claim audit (industry claim finding).
-
Review outputs and create a documented summary.
Save or screenshot the calculator report. Create a one-page summary for your insurer that lists: total replacement cost, per-square-foot figure, line-item increases (permits, codes), and the date/index used for inflation. This documentation reduces dispute risk at claim time.
Verification and sanity checks
-
Cross-check with one local contractor quote.
Obtain a high-level contractor estimate for full rebuild (not detailed bid) to compare—ask for a per-square-foot rebuild number. If your calculator result and contractor number differ by >15%, investigate the discrepancy—materials, finish levels, or omitted items are common causes.
-
Update annually and after major renovations.
Set a calendar reminder to re-run the calculator each policy renewal or after significant changes (new roof, addition, major kitchen or bathroom remodel). Document the new inputs and reasons for change.
Transition: After learning the step-by-step method, you should understand the variables that alter replacement cost outputs. Next we explore those variables in detail.
Key Factors That Influence Replacement Cost Calculations

Replacement cost calculators combine base construction costs with a set of modifiers. Below are the most influential elements and how to quantify them.
Material and labor costs
Materials (lumber, drywall, roofing, finishes) and labor are the primary cost drivers. Use regional data when possible. Typical guidance:
- Baseline material/labor split: 40–60% materials / 40–60% labor depending on trade intensity.
- Labor premiums: urban coastal regions often increase labor costs by 10–40% above national average.
- Material surges: resin-based products, specialty stone or custom millwork can add 20–100% over baseline.
For deeper costing methodologies and data inputs see the construction price calculator guide.
Permit and code compliance costs
Permits and mandatory code upgrades are often underestimated. Typical ranges:
- Permit fees: 0.5–3% of construction value (varies by jurisdiction).
- Code upgrades: $5,000–$50,000 depending on seismic/fire/electrical/wind load requirements and whether sprinklers or structural upgrades are mandated.
Always check with your local building department for exact permit fee schedules and historic changes in code that could apply during reconstruction.
To see how a single-room upgrade affects total rebuild cost, review the example on bathroom renovation costs.
Home size and features affecting replacement cost
Smaller homes may have higher per-square-foot costs because certain fixed systems scale poorly (HVAC, roofing penetrations). Special features that raise per-square-foot costs include:
- High ceilings, complex architectural details (+10–40%).
- Custom trim, built-ins, premium finishes (+20–100%).
- Accessory structures (garages, pools) priced separately but included in total replacement value.
Material and labor variation guidance is available in the home improvement guide.
Inflation impact on rebuilding costs
Construction inflation can materially alter replacement cost year-to-year. Use an annual uplift of 4–12% in volatile markets; older indices may understate current costs. According to a 2024 industry report (industry report), national construction cost inflation ranged 6–9% in the prior 12 months in many regions.
Other considerations
- Demolition complexity (asbestos, limited access) raises cost significantly.
- Site conditions—slope, soil type, access for equipment—affect foundation and site work costs.
- Time-to-rebuild considerations and contractor backlog may add premium costs for expedited projects.
Transition: Having covered major inputs, next we show exactly what you should enter into an online replacement cost calculator and what to expect in its outputs.
Using an Online Replacement Cost Calculator: What to Enter and Expect
Below is a practical walk-through of inputs and the typical outputs you should verify. I describe every field you’ll see in most replacement cost estimator interfaces and explain how to choose values defensibly.
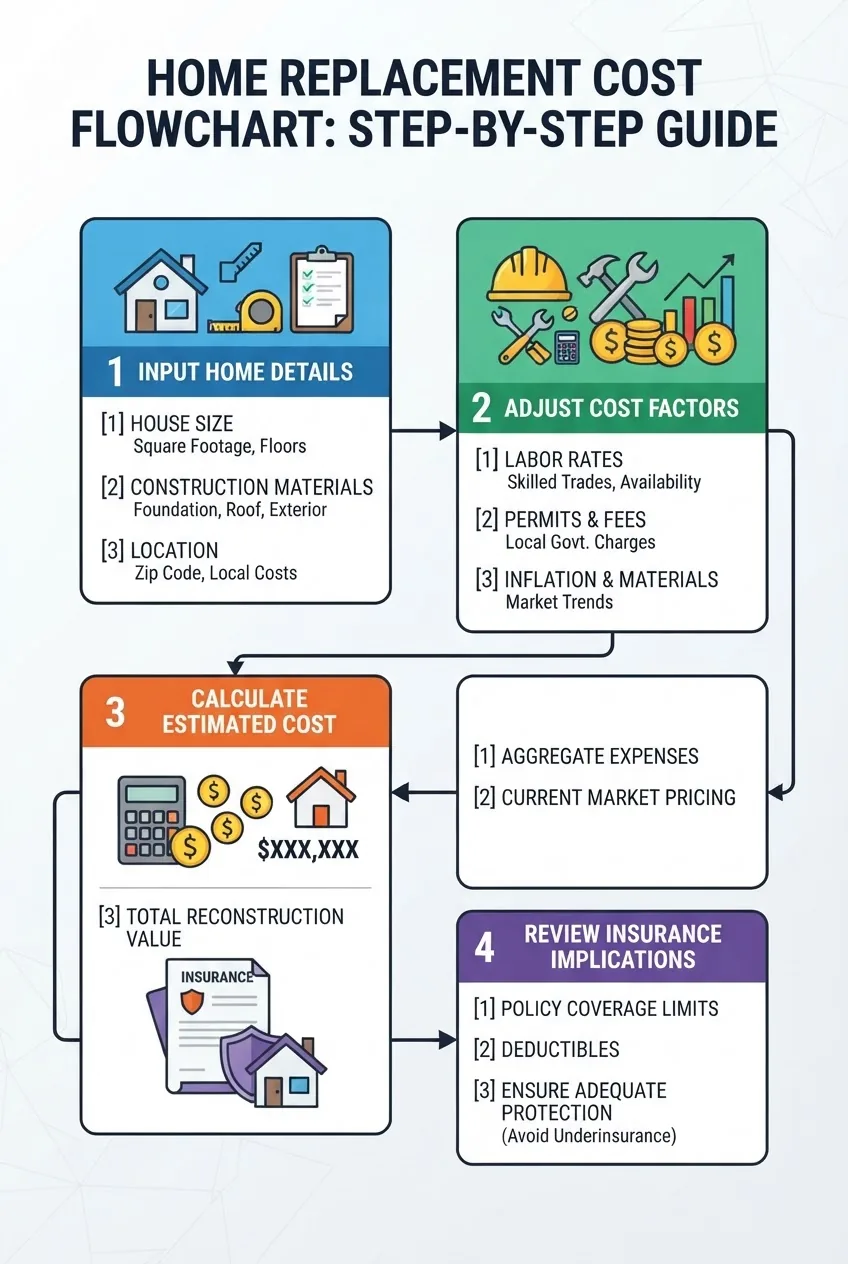
-
Input property identifier and location.
Enter address, ZIP code and year built. Location drives regional multipliers and building code triggers. If asked for flood or wildfire zones, be honest—these can add mitigation or specialized rebuilding requirements.
-
Enter finished area and building footprint.
Provide square footage for each finished level and for conditioned vs unconditioned space. Do not include garages, porches or unfinished basements in finished area unless the calculator specifies separate entries.
-
Select construction type and exterior materials.
Pick structural system (wood frame, masonry, steel), roof material and exterior finish—the calculator maps these to cost multipliers. If unsure, choose the closest match and add a note in your summary that material choices were estimated.
-
Choose finish level for interiors.
Most calculators have Basic / Average / Upgraded presets. If your kitchen and baths are clearly upgraded (stone counters, custom cabinetry), select Upgraded. If mixed, use the hybrid option if available and list percent of home at each finish level.
-
List systems and special items.
Check items for finished basement, attached garage, deck, fireplace, pool, central AC, etc. Each box adds a line item to the estimate—ensure you do not double-count areas already included in square footage.
-
Enter permit and site work choices.
Choose whether the estimate should include demolition, rock excavation, retaining walls or special foundation types. If there’s a known code upgrade (e.g., seismic retrofit), add that as an adjustment.
-
Adjust regional inflation and contractor availability.
Set the inflation factor for your rebuild timeline—if you expect reconstruction in 12 months, add a future inflation percentage. Many calculators provide a default based on economic indices.
-
Review detailed breakdown and sensitivity.
Good calculators show line-item breakdown: base construction, roofing, finishes, systems, permits, demolition, contingency. Run sensitivity tests: increase material cost by 10% and see total impact; if total jumps >8–10%, document the sensitivity for the insurer.
-
Export and document the report.
Save PDF output and record the date, inputs and any local notes. If sharing with your agent, include contractor cross-checks and permit fee verification for credibility.
For a complementary tool aimed specifically at setting policy costs, see the house insurance estimator.
Transition: Before you finalize your numbers, understand common mistakes other homeowners make so you can avoid them.
Common Mistakes and Pitfalls When Estimating Replacement Costs
-
Underestimating permit and code costs.
Explanation: Owners often forget that new rebuilds must meet current codes; I once saw a calculator omit a mandatory seismic upgrade that added $28,000 to a coastal rebuild.
-
Using sale price or market value as a proxy.
Explanation: Market value includes land and location premiums; I encountered a homeowner who insured to market value and discovered a 40% shortfall when attempting a total rebuild after a fire.
-
Ignoring special features and custom finishes.
Explanation: Custom millwork, historical replication, or built-in stonework are costly—I’ve seen these items double local per-square-foot costs if not captured correctly.
-
Failing to update estimates after renovations.
Explanation: After a major kitchen remodel, one client kept the previous replacement cost and found their coverage insufficient for upgraded fixtures and appliances during a claim.
-
Overreliance on low-detail free tools without verification.
Explanation: Free replacement cost estimator outputs can be useful starting points but may omit demolition, debris removal and code triggers I always verify.
-
Not documenting the assumptions.
Explanation: If the insurer questions a claim, clearly documented inputs (measurements, finish levels, local multiplier) make the estimate defensible; I always keep screenshots and source notes.
How Replacement Cost Impacts Your Home Insurance Premiums and Coverage
Replacement cost directly shapes the dwelling coverage limit (often called Coverage A). A higher replacement cost increases the limit and typically raises premiums linearly with the insured amount, but other factors (deductible, risk, claims history) also matter.
Key relationships:
- Higher replacement cost → higher coverage limits → higher premiums.
- Lower deductible → higher premiums, but reduces out-of-pocket in a claim.
- Replacement cost coverage (RCV) vs actual cash value (ACV): RCV pays to rebuild; ACV pays replacement minus depreciation, lowering premium but increasing risk of inadequate funds to rebuild.
For deeper coverage specifics and options, read the home repairs insurance guide.
Below is a simple comparison table showing typical outcomes for RCV vs ACV and how deductible choices affect premium risk.
| Policy Type | Claims Payout | Premium Impact |
|---|---|---|
| Replacement Cost Value (RCV) | Full rebuild cost (no depreciation) | Higher than ACV; depends on limit |
| Actual Cash Value (ACV) | Rebuild cost minus depreciation | Lower premium; greater out-of-pocket risk |
| RCV with high deductible | Full rebuild minus deductible | Moderate premium; higher immediate cash need |
Example: If your calculator returns $400,000 replacement cost and you select a $2,500 deductible, the insurer will base your premium on the $400,000 limit. If you opt for ACV, the insurer might quote a premium 15–30% lower but will deduct depreciation at claim time.
Transition: Finally, here are tools and extra references to run additional checks and support your estimates.
Additional Resources and Tools for Replacement Cost and Home Insurance Calculations
Curated tools and references to validate and expand your estimate:
- average home repair estimates — breakdowns for common repairs to help validate contingency amounts.
- handyman cost calculator — useful for small repair cost inputs in contingencies.
- remodel quotes guide — helps contextualize upgrade costs that alter replacement values.
- whole house renovation cost calculator — compare rebuild vs full renovation budgeting.
- remodel quotes guide — additional reference for room-level costing.
- External authoritative references:
- US Department of Housing and Urban Development — guidance on housing programs and some cost data (government).
- National Association of Insurance Commissioners — industry rules and consumer guidance (industry regulator).
- RSMeans — construction cost data and indices (construction data provider).
Also see the handyman cost calculator for small repairs input sizing.
Transition: Below are practical closing materials to finalize your work and know when to escalate to a professional.
Common mistakes and how to avoid them
I once underestimated permit fees for a midwestern rebuild by not checking the county schedule; that added $9,600. I learned to always call the local building department first. I also assumed my finished basement was the same quality as upstairs—turns out it was lower-grade, which should have reduced the per-square-foot uplift, not increased it. When in doubt, I document assumptions and get one contractor sanity-check.
Final checklist to verify your replacement cost estimate
- Measured finished square footage recorded and matched to tax/deed records.
- Exterior and finish levels noted (Basic/Average/Upgraded) with photographic evidence.
- Local multiplier and inflation factor documented with source and date.
- Permit and code upgrade allowances included and verified with local building department.
- Demolition and debris removal considered and priced.
- Line-item sensitivity test performed (+10% materials, +10% labor) and results saved.
- Calculator output exported, dated, and stored with assumption notes.
When to call in a professional
Call a licensed contractor or certified appraiser when your home has: historic or custom architectural features, unusual site constraints, suspected hazardous materials (asbestos, lead), or when the calculator and a contractor estimate differ by more than 15%. For assistance with insurance valuation disputes, a public adjuster or independent appraiser is appropriate.
Closing summary: You now know how to use an estimated replacement cost calculator, what inputs matter most, common pitfalls, and how replacement cost affects your insurance. Use the checklist to validate your work and keep records for renewal or claims. Ready to update your policy? Run the calculator, document the output and share it with your agent to align coverage with a defensible rebuild estimate.
Call to action: Rerun your calculator now with today’s prices and save the report with date-stamped screenshots to present at your next policy renewal.