

What you’ll achieve: By the end you will have a clear, step-by-step plan to scope, choose, and manage a successful home improvement house project—repair, remodel or full residential renovation—tailored to your skill level. Estimated time: planning 1–3 weeks; typical small-to-medium projects 1–12 weeks. Skill level assumed: homeowner with basic DIY skills to a project manager coordinating trades.
Before you start
- Permits and local code check (call your local building department)
- Basic tool kit: tape measure, cordless drill (18V), pry bar, levels (24″ and 4″), stud finder
- Protective gear: gloves, goggles, N95 mask, knee pads
- Essential materials list: fasteners, caulk, primer, paint, drop cloths
- Documentation folder: photos, sketches, quotes, warranty papers
Transition: The hands-on guidance below begins with a broad introduction to the scope of projects you’ll encounter, then walks through types, best-value upgrades, whether to DIY or hire a remodeling service, common problems and a full step-by-step renovation workflow.
Introduction to Home Improvement House Projects
Home improvement house projects span simple home improvement work—like painting and weatherproofing—to comprehensive residential renovation that alters a home’s footprint or systems. In this guide I define terms you’ll use and show how to choose the right scale for goals like increased comfort, longevity, or resale value.
Definitions up front: a home refurbishment usually means refreshing finishes and fixtures without changing structure; a remodeling service implies trade work that modifies layout or systems; property renovations often refer to larger scope projects that may need permits. I’ll use these consistently so you can compare trade-offs.
Project triage: every job is one of three types—cosmetic, structural, or maintenance. Cosmetic updates (paint, cabinetry fronts) deliver quick visual impact. Structural and system work (roof, foundation, HVAC) protect the home long-term. Maintenance (gutter cleaning, sealant replacement) prevents costly failures later.

According to a 2024 industry report, homeowners prioritize kitchens and bathrooms for return on investment and usability; plan with that in mind. Remember: local codes and conditions vary—consult a pro if your project touches structural framing, gas, or electrical systems.
Transition: Next we break down the core types of work so you can classify your project and make informed choices about scope and sequencing.
Understanding Types of Home Improvements and Repairs
Classifying work helps decide who should do it, whether permits are required, and what success looks like.
-
Cosmetic improvements — paint, trim, cabinetry refacing, new fixtures.
- Scope: surface-level, no structural or system changes.
- Permits: usually not required.
- Skill: advanced DIY to contractor for speed/finish.
- When to choose: when you want immediate curb appeal or household refresh.
-
Functional upgrades — kitchen appliance replacement, bathroom fixture upgrades, insulation improvements.
- Scope: may touch plumbing or minor electrical work; often improves comfort and energy efficiency.
- Permits: sometimes required for plumbing/electrical changes.
- Skill: DIY skilled or hire trades for code compliance.
-
Structural and systems — roof replacement, foundation repair, load-bearing wall changes, HVAC replacement.
- Scope: major; affects home safety and value.
- Permits: almost always required.
- Skill: professional remodeling service or certified contractors only.
-
Maintenance and repair — gutter cleaning, caulk renewal, minor siding repair, window seal replacement.
- Scope: small jobs that prevent larger failures.
- Permits: rarely needed.
- Skill: DIY friendly; handyman or gutter remodel service for specialized tasks.
-
Adaptive reuse and renovation — converting garage to living space, basement finishes, ADA modifications.
- Scope: often requires system upgrades (insulation, egress, electrical).
- Permits: required; inspections likely.
- Skill: contractor-led project management recommended.
-
Emergency and repair remodel — water damage remediation, mold removal, immediate structural stabilization.
- Scope: urgent repairs that sometimes lead to subsequent renovation.
- Action: prioritize stopping damage source, then remediation.
To decide where your project sits, ask: Does the work change load paths or building systems? If yes, treat it as a structural or systems renovation. If it’s purely cosmetic, treat it as household improvement with low permit risk.
Transition: With categories clear, choose the right improvements for value—next section covers the best home improvements and their trade-offs.
Best Home Improvements to Increase Property Value
This section lists proven upgrades—what they accomplish, when they pay back, and specific pros and cons so you can prioritize the best home improvements for your goals.

-
Kitchen remodel (mid-range)
Why: Kitchens are major lifestyle and resale drivers. A mid-range kitchen renovation with new cabinets, countertops, and appliances modernizes flow and increases appeal.
Pros: High buyer interest, improved efficiency, modern storage.
Cons: Disruption for 2–6 weeks; costs vary widely.
kitchen remodel cost estimator
Best use: when your layout is dated or appliances inefficient. Use durable finishes such as quartz countertops and soft-close drawers for long-term value.
-
Bathroom upgrades (targeted)
Why: Bathrooms sell homes. Replacing vanities, updating tile and lighting yields strong visual returns.
Pros: High perceived value, modest disruption if footprint unchanged.
Cons: Plumbing moves increase cost and require permits.
bathroom renovations calculator
Best use: update fixtures, add ventilation, and choose neutral finishes that broaden buyer appeal.
-
Exterior and curb appeal
Why: First impressions drive interest—paint, siding repair, new entry doors and landscaping can increase showability.
Pros: Visible improvements often have fast perceived ROI.
Cons: Weather windows and proper material selection are important to avoid rework.
-
Roof and gutter upgrades
Why: Structural essentials protect value. A new roof or professional gutter remodel service prevents water intrusion and is a strong selling point.
Pros: Extends life of house, reduces insurance flags.
Cons: Not glamorous; but critical if your roof is near end-of-life.
-
Energy efficiency improvements
Why: Insulation, efficient windows, and heat-pump HVAC systems improve comfort and lower operating costs.
Pros: Growing buyer demand; operational savings.
Cons: Technical sizing required; professional installation recommended for HVAC and glazing.
-
Basement and attic conversions
Why: Finished square footage typically yields high value per square foot when done to code.
Pros: Adds usable space; increases appraisal value when properly permitted.
Cons: Moisture control and egress windows are frequent issues—handle these early.
-
Flooring replacement
Why: Uniform, modern flooring ties together improvements. Engineered hardwood or quality LVP are popular.
Pros: Immediate visual uplift, easy to estimate scope.
Cons: Subfloor problems may add time and cost.
-
Smart home and lighting
Why: Smart thermostats, LED upgrades and layered lighting improve daily comfort and are low-disruption.
Pros: Affordable, immediate UX benefits.
Cons: Over-automation without user-friendly setup reduces perceived value.
-
Minor layout improvements
Why: Removing a short wall or reconfiguring a closet can improve flow without full structural work.
Pros: High perceived change for moderate cost when not load-bearing.
Cons: Verify that walls are non-load-bearing before removal.
Decision rule: prioritize projects that either (1) eliminate known defects (roof, HVAC, water intrusion), (2) improve daily living (kitchen, baths), or (3) increase usable square footage. According to a 2024 industry report, mid-range kitchen and bathroom renovations rank highest for homeowner satisfaction.
Transition: Choosing to DIY or hire a house remodeling services team affects timeline, quality, and risk—compare options next.
DIY vs. Professional Remodeling Service: Pros and Cons
Comparing DIY against hiring a formal remodeling service or house remodeling services helps you weigh cost savings against risk and time.
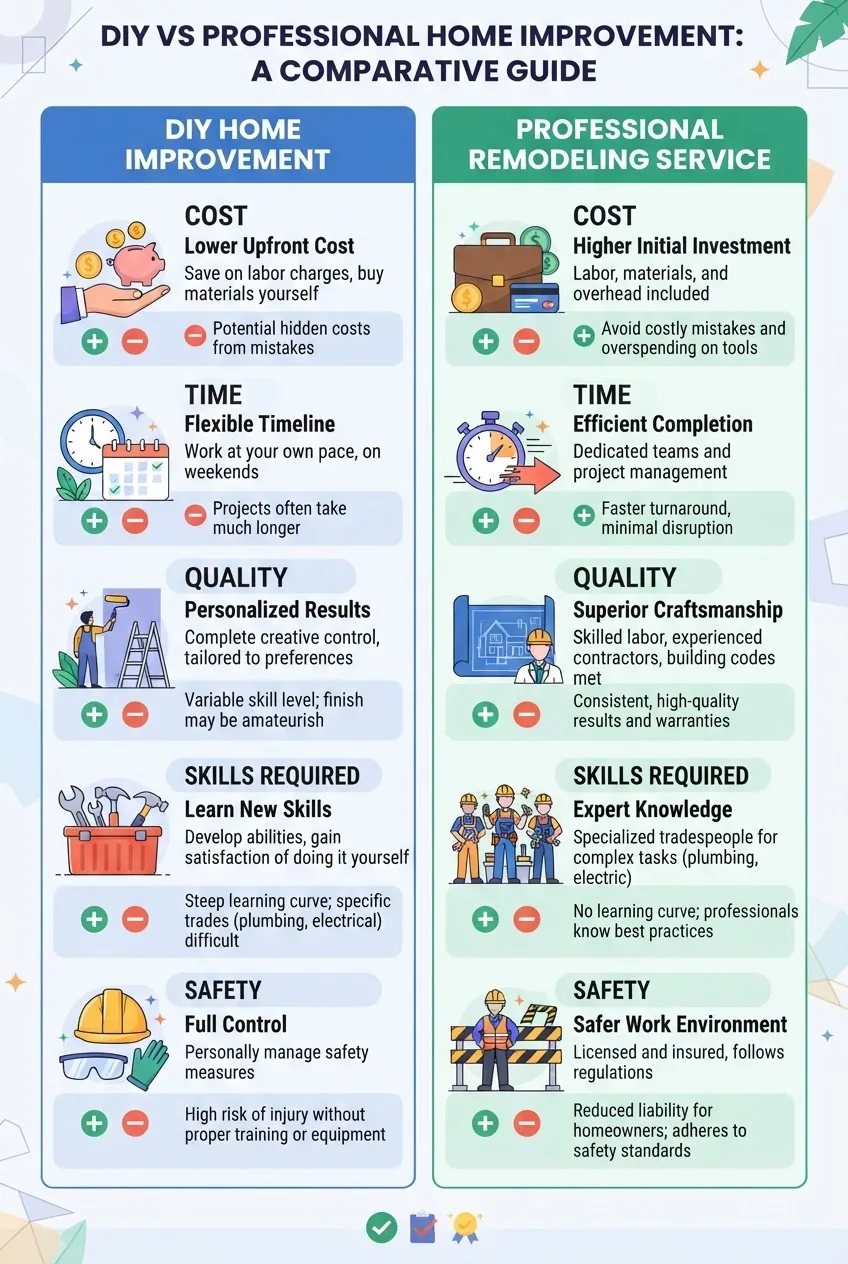
| Aspect | DIY Home Improvement | Professional Remodeling Service |
|---|---|---|
| Cost | Lower upfront labor cost but hidden expenses possible | Higher upfront cost; includes labor, warranty, project management |
| Time | Often longer due to part-time work and learning curve | Faster completion with crew scheduling |
| Quality | Variable—depends on skill and tools | Consistent if contractor is credentialed; warranties often provided |
| Safety and code | Risk of code violations if unpermitted; safety hazards | Contractors handle permits and inspections |
| Complexity fit | Good for painting, trim, small installs | Better for structural, system, and whole-room remodels |
Short prose with examples: I once managed a modest bathroom refresh as a DIY weekend project—replacing a vanity and tile backer—but when the toilet flange was compromised I paused and called a contractor to avoid improper sealing. For larger projects, hiring a licensed remodeling service saved time and avoided costly rework. If you plan to do some tasks yourself, split the scope: contractor for systems, you for painting and cabinetry hardware.
Transition: Next we review common challenges during home improvement and repair projects and how to troubleshoot them efficiently.
Common Challenges in Home Improvement and Repair Projects
From hidden damage to scheduling delays, I’ll describe common problems with actionable steps to avoid them, and point you to resources for realistic cost expectations.
-
Hidden damage discovered after demolition
Steps: 1) Stop work and document with photos; 2) Assess safety (electrical, structural); 3) Prioritize remediation steps—temporary weatherproofing, mold mitigation, structural shoring; 4) Obtain a second professional opinion if needed.
-
Unexpected subsurface conditions (rot, termite damage)
Troubleshooting: Remove compromised material in a 12–24″ perimeter until you hit solid members, treat for pests if present, and sister or replace framing as required. For major infestations call a licensed pest control specialist.
-
Scheduling trades and lead times
Steps: Build a lead-time buffer of 2–4 weeks for specialty items (custom cabinets, tile orders). Lock in a phased schedule with buffer days and communicate weekly with trades. Use milestone payments tied to progress to keep momentum.
-
Permits and inspections delays
Troubleshooting: Submit complete permit packets; include drawings, load calculations, and product spec sheets. If an inspection fails, address the item directly, document corrections, and request a re-inspection promptly.
-
Materials mismatch or color differences
How-to: Always order material with a 10% overage; view larger samples in the project lighting; approve finishes in-situ before full installation.
-
Scope creep and budget drift
How-to: Freeze scope with a signed change-order process and price list. Track changes in a spreadsheet and require owner approval for any extras beyond a fixed contingency (5–15% recommended for renovations).
-
Quality control issues
How-to: Inspect every trade’s work at the end of each day for the first week and before covering assemblies (e.g., before drywall close-up). Keep a punch-list and enforce correction timelines (48–72 hours typical).
Real-life example: During a kitchen renovation I supervised, we uncovered a noncompliant gas line. We immediately halted work, contacted a licensed plumber, and re-phased the project. This quick action prevented a safety hazard and minimized rework.
Transition: With common challenges managed, the next section provides the full step-by-step guide to plan and execute a residential renovation, including checklists and tools to estimate costs.
Planning and Executing a Successful Residential Renovation
Here is a detailed, step-by-step hands-on workflow for executing a safe, code-compliant residential renovation. Follow these numbered steps sequentially; each step includes practical checklists and tools.
-
Define goals and success criteria
Action: Write a one-page project brief that lists: primary objective (e.g., add a half bath), secondary objectives (energy efficiency), fixed constraints (no footprint change), must-have features, and a success metric (project complete within X weeks with <5% budget variance).
- Time: 1–2 days to draft and refine.
- Deliverable: Signed project brief or email confirmation with stakeholders.
-
Conduct a site survey and documentation
Action: Measure spaces (writer’s tip: measure twice, record three times), photograph every wall and system, and create a measured drawing to scale on paper or using a simple CAD/sketch app.
- Tools: tape measure, laser distance meter, camera.
- Deliverable: set of dimensioned sketches and photos stored in project folder.
-
Classify project type and required permits
Action: Based on the earlier types, determine whether your job is cosmetic, functional, structural, or maintenance. Call your local permitting authority with the project brief to confirm permit needs.
- Time: 1–3 business days to get guidance.
- Note: Structural/system changes typically require engineered drawings.
-
Assemble a team and obtain quotes
Action: Solicit at least 3 written quotes for any trade work over a specified dollar threshold (e.g., $2,000). Use standardized scope language across all quotes to compare apples-to-apples.
- Deliverable: 3+ bids, reference checks, contractor insurance and license verification.
- Red flag: vague timelines, no references, or insistence on large upfront payment.
-
Create a detailed schedule and phasing plan
Action: Build a schedule with task dependencies. For example, demo (2–3 days) -> rough-in MEP (3–7 days) -> inspections -> insulation/drywall (3–7 days) -> finishes (1–3 weeks). Allow weather contingencies for exterior tasks.
- Tip: Always include milestone review points after MEP rough-ins and before final finishes.
-
Lock materials and order long-lead items
Action: Order cabinets, countertops, windows, and appliances as soon as timeline permits. Confirm delivery windows and staging area for site storage (allow 10% overage for tile and paint).
- Deliverable: material procurement list with purchase dates and tracking numbers.
-
Prepare site protection and logistics
Action: Install dust barriers (zip walls), protect floors with rosin paper, and plan a debris staging/collection system. Schedule dumpster and secure material drop zones.
- Time: 1 day prep prior to demo.
-
Execute demolition and rough-ins
Action: Demo only the agreed scope. Inspect for hidden conditions during demo, photograph, and log discoveries. For plumbing/electrical rough-ins follow code and schedule inspections before covering.
- Tip: Don’t cover work (e.g., framing or rough plumbing) until it has passed inspection and you have signed off.
-
Complete inspections and corrective work
Action: Address any red-tag items immediately. Contractors should provide permit cards and inspection results. Close permits only after final inspection and certificate of occupancy (if applicable).
- Deliverable: permit sign-offs and compliance paperwork.
-
Install finishes and perform quality checks
Action: Install cabinets, trim, tile, fixtures and lighting. Use a daily punch-list for small fixes. Before final payment, do a thorough walkthrough with contractor and create a final punch list with deadlines for corrections (typically 14–30 days).
-
Final walkthrough, documentation, and handover
Action: Collect warranties, maintenance instructions, and final invoices. Store digital copies in your project folder. Make final payment as agreed and obtain lien releases where required.
Tools and calculators: to validate larger budgets, use a house renovation price guide or a whole house renovation cost calculator for comprehensive projects.
Common mistakes and how to avoid them (from my experience)
I once underestimated the time required for cabinet lead times, and the entire finish schedule slipped by three weeks. Now I always order long-lead items before demo. I also learned to check subfloor flatness before laying new flooring—skipping that step meant costly rework.
Compact checklist (verify these before final sign-off)
- All permits obtained and inspections passed
- Three-point photos and documented fixes for hidden damage
- Material and appliance warranties collected
- Punch-list items resolved or scheduled within 14 days
- Final invoice, lien releases and insurance certificates on file
When to call in a professional
Call a licensed contractor if the job involves load-bearing walls, gas lines, major electrical service changes, structural foundation work, or complex HVAC systems. For anything involving health hazards (mold, asbestos) use certified remediation services.
Transition: Selecting the right remodeling and repair services ensures the plan above is executed reliably—next section covers how to choose them.
Selecting Reliable Remodeling and Repair Services
Choosing the right team turns plans into durable results. Use the guidance below to vet contractors and select services for different scopes of home improvement construction and residential renovation services.
Step 1: Verify credentials. Always ask for license numbers, insurance (general liability and workers’ compensation), and references. Check licenses with your state licensing board and ask for recent customer photos of completed work.
Step 2: Check reviews and references. Contact two recent clients and ask whether the project stayed on schedule and whether final costs matched the quote. If possible, visit a recently completed job to inspect finish quality.
Step 3: Confirm warranties and scope clarity. A reputable remodeling service provides a written contract with a clear scope, payment schedule, and warranty period (commonly 1 year on workmanship, manufacturer warranties separate).
Tools and short recommendations:
- replacement cost calculator — useful when assessing finished project value vs. insured value.
- handyman estimate and cost calculator — good for one-off maintenance and household improvement tasks.
- home repair app guide — use to find local trades with verified reviews.
- home repair Austin TX guide — example of how to vet local experts (adapt approach to your area).
- Section 504 home repair program — resource for eligible senior homeowners.
- home repairs insurance guide — consult post-renovation coverage options.
- house insurance estimator — helpful when renovation changes insured replacement values.
External authority resources: refer to national construction and consumer guidance when selecting contractors:
- U.S. Department of Housing and Urban Development (HUD) for federal housing and safety guidance.
- National Association of Home Builders (NAHB) for remodeling best practices and standards.
- Federal Trade Commission (FTC) consumer protection advice on hiring and contracts.
Transition: After finishing work, a focused maintenance plan will protect your investment—see the next section for post-renovation care and linked resources to control ongoing costs.
Maintenance Post-Renovation: Ensuring Longevity and Value
Post-renovation maintenance preserves value and prevents small issues from becoming expensive. Think of maintenance like routine car service: a small recurring cost avoids major replacements.
Key ongoing tasks:
- Seasonal gutter inspection and cleaning to prevent water damage.
- HVAC filter replacement every 1–3 months and annual service checks.
- Inspect seals around windows and doors annually; recaulk as needed.
- Test safety devices (smoke and CO detectors) every 6 months.
- Follow manufacturer maintenance schedules for appliances and systems.
To help you plan, review our detailed annual maintenance cost guide for home repair and budget that outlines common recurring tasks and timelines to keep costs manageable.
tankless water heater maintenance cost guide
water heater service cost guide
According to a 2024 industry report, proactive maintenance reduces major repair incidents by a measurable share—tracking maintenance tasks quarterly prevents small failures from escalating.
Quick tips block:
Monthly: HVAC filter check; kitchen and bath ventilation use.
Quarterly: Check for leaks at fixtures, inspect roofing valleys visually.
Annually: Professional HVAC tune-up; roof and gutter professional inspection.
For long-term budgeting, use our annual maintenance cost guide for home repair and budget to schedule and estimate recurring tasks and keep your renovation investment protected.
Transition: The final section summarizes the practical takeaways and suggests next steps.
Conclusion: Making Your Home Improvement House Project a Success
Summary: Use the classification framework to choose the right scale of work—cosmetic, functional, structural or maintenance. Prioritize essential property renovations (roof, water management) before discretionary finishes. Decide whether to pursue diy and home improvement for small tasks or hire certified remodeling service teams for structural work. Follow the step-by-step planning and execution checklist above to avoid typical pitfalls.
Next step: Draft your project brief, gather photos and measurements, and solicit at least three bids for contractor work. When ready, use the linked planning tools to validate timelines and keep your renovation on track.
Call to action: Start your project folder now—take the first photos, sketch the layout, and set up a meeting with one contractor this week to get momentum.