
Common home maintenance problems list: by the end of this guide you will be able to diagnose the 12 most frequent home issues, perform basic DIY repairs that save time and money, and know when to call a pro. Expect to spend 4–10 hours for a full home walk-through and basic fixes; skill level required: beginner to intermediate DIYer.
Before you start, gather tools and supplies and read the safety notes below so you avoid common hazards and wasted effort.
Before you start
- Personal protective equipment: safety glasses, nitrile gloves, dust mask (N95) for mold work.
- Basic tool kit: adjustable wrench, channel-lock pliers, 3/8″ & 1/4″ screwdrivers, utility knife, headlamp.
- Measurement & diagnostic: multimeter (for electrical), infrared thermometer, moisture meter, small camera or phone for hard-to-see spaces.
- Consumables & repair parts: plumber’s tape (Teflon), silicone caulk, weatherstripping, electrical outlet testers, replacement filters (HVAC), 10–20 roofing shingles, gutter scoop.
- Reference & permits: homeowner manual, local building code contacts, and contact list for licensed pros.
Safety first: do not attempt major electrical, roof, or foundation repairs without a licensed professional. For electrical code guidance see OSHA guidance. For mold and indoor air quality see EPA: Mold. For trade best practices consult the National Association of Home Builders at NAHB.
-
Overview of Common Home Maintenance Problems
This section gives a structured snapshot: the problems you’ll likely find, how often they occur, and simple triage steps. Use this as your quick reference during a walk-through.
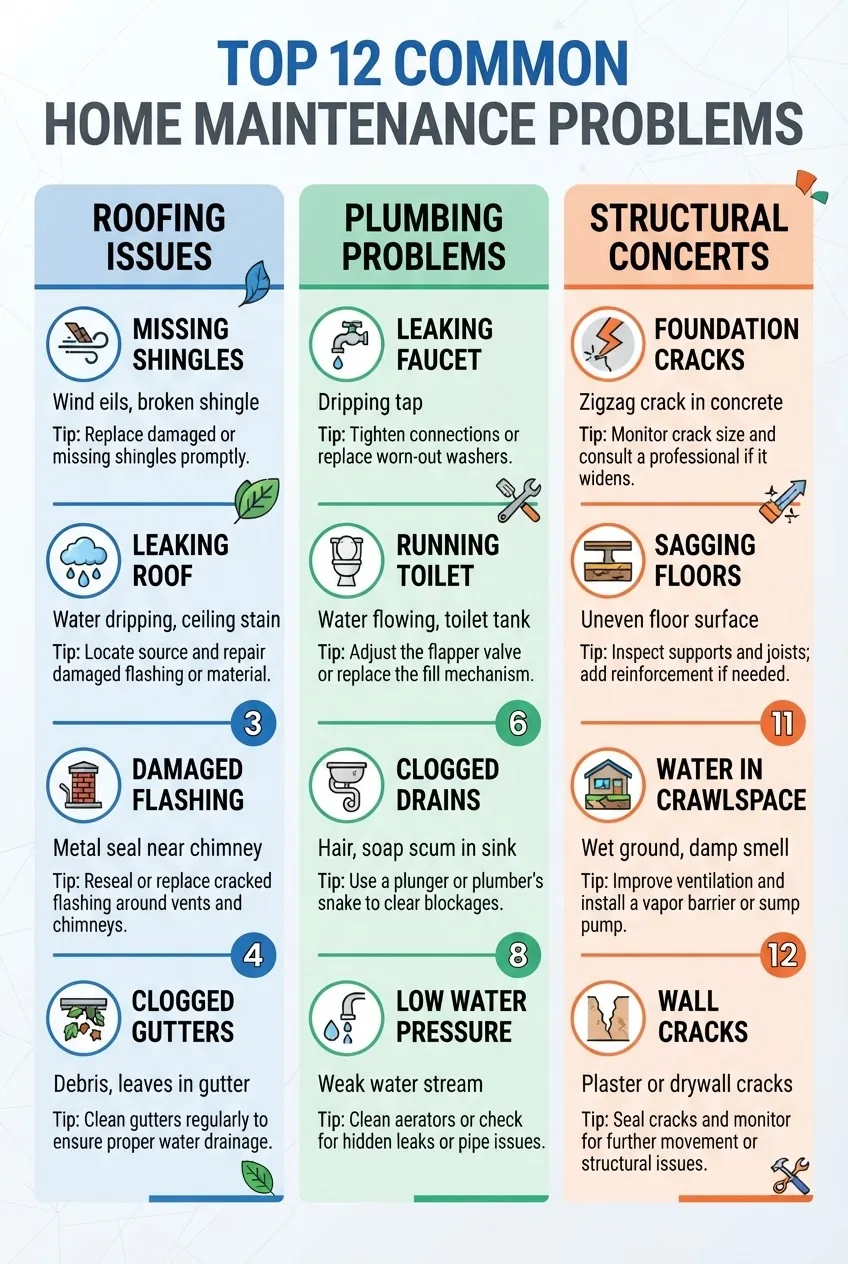
Top categories at a glance — roof leaks, plumbing clogs and leaks, HVAC faults, electrical problems, water heaters, foundation cracks, mold, gutters, door/window seals, pests, paint/siding damage, appliance failures, drainage issues, and insulation gaps. Each item below links to a full section with steps and DIY limits.
Start by prioritizing: safety-critical systems (electrical shorts, gas leaks, structural cracks, active roof leaks) first; systems affecting health (mold, ventilation) second; efficiency/comfort issues (insulation, HVAC filters) last. According to a 2024 industry report, homeowners who follow a prioritized checklist reduce emergency repair calls by roughly 30% — a useful benchmark when planning seasonal maintenance.
For a ready-made schedule and calendarized tasks, see the full maintenance checklist below.
Complete Home Maintenance Checklist for Yearly and Monthly Care
comprehensive maintenance inspections are recommended annually to catch items listed here before they become major repairs.
-
Roofing Problems and Repair Solutions
Roofs are your home’s primary weather barrier—the “skin” that protects structure and interiors. Regular checks reduce water intrusion and rot. Inspect twice a year and after major storms.
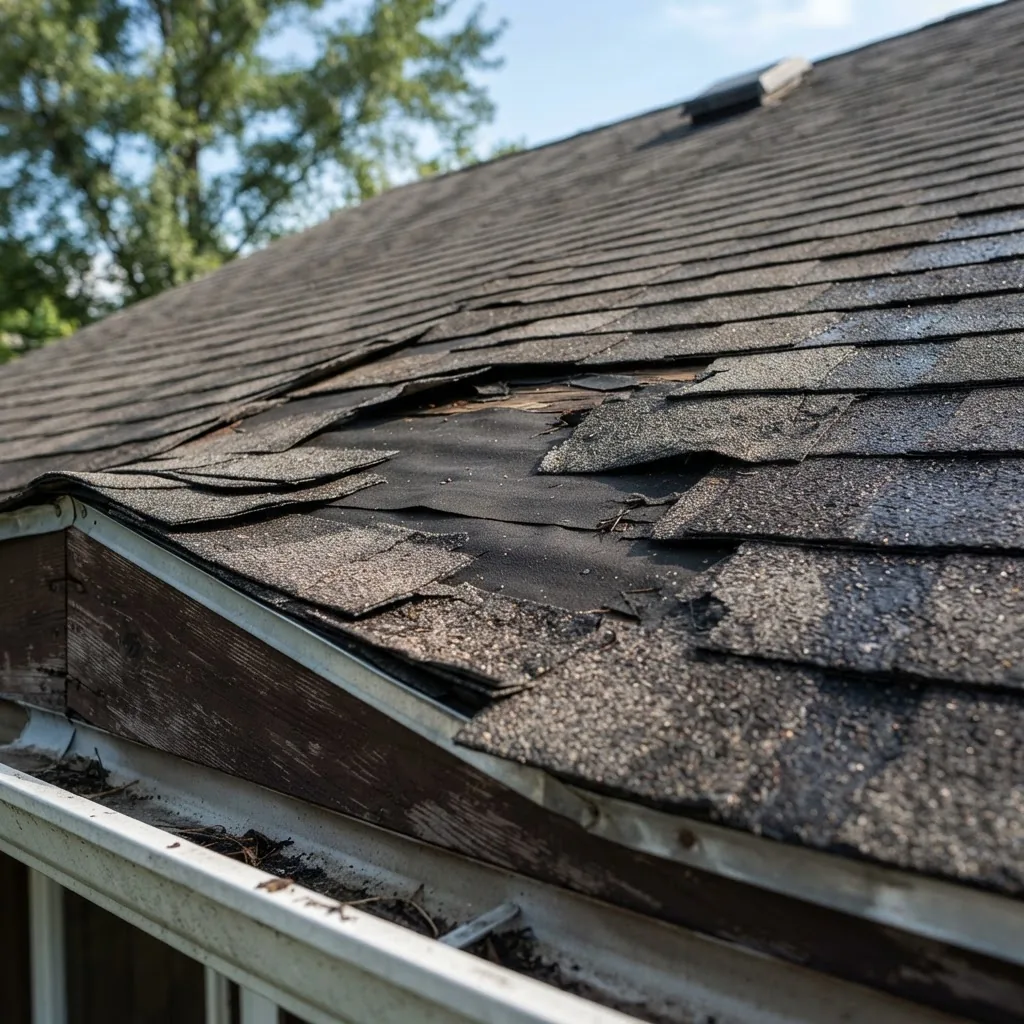
- Identify leaks and water stains: climb safely on an extension ladder or inspect from the attic with a flashlight. Look for dark spots, sagging sheathing, or mold near roof decking. If water is actively dripping, place a bucket and use a tarp if immediate repair isn’t possible.
- Replace missing or broken shingles: remove damaged shingle nails with a pry bar, slide new shingle into place, seal tabs with roof cement, and use roofing-grade nails at 1″ above tab line, 2 nails per shingle (or per manufacturer). Replace up to 10 shingles as a DIY task; beyond that, call a roofer.
- Repair flashing around chimneys and vents: check metal flashing for gaps or rust. Remove failed caulk, apply roofing-grade sealant, and secure flashing with corrosion-resistant screws. Flashing repair requires careful overlap technique; if flashing sits under or over old layers incorrectly, hire a professional.
- Address clogged valleys and water pooling: clear debris; ensure underlayment is intact where valleys meet. Standing water can indicate sagging decking—if a 1/4″ ponding remains after rain, schedule a pro evaluation.
- Replace deteriorated underlayment and decking: inside attic, look for soft spots on decking. Replace sections up to 2 ft square if comfortable with roof access; more extensive rot needs a licensed roofer with structural repair capacity.
- Check and secure ridge vents and soffit vents: ensure vents are clear of bird nests and insulation. Replace damaged vents; maintain 1–2″ of clearance inside attic baffles to keep airflow consistent.
- Preventative maintenance: trim trees 6–8 ft from roof edge, remove moss with a 50:50 mix of water and household bleach applied from the roof edge (avoid runoff to plants), and inspect after heavy windstorms.
When to call a pro: active, widespread leaks, sagging roof planes, repeated flashing failures, or replacement of the entire roof. Always get two estimates and check contractor insurance and local licensing.
-
Plumbing Issues Homeowners Frequently Face
Plumbing problems are both common and varied—clogs, drips, low water pressure, and leaks that cause hidden damage. Triage quickly to avoid mold or structural harm.
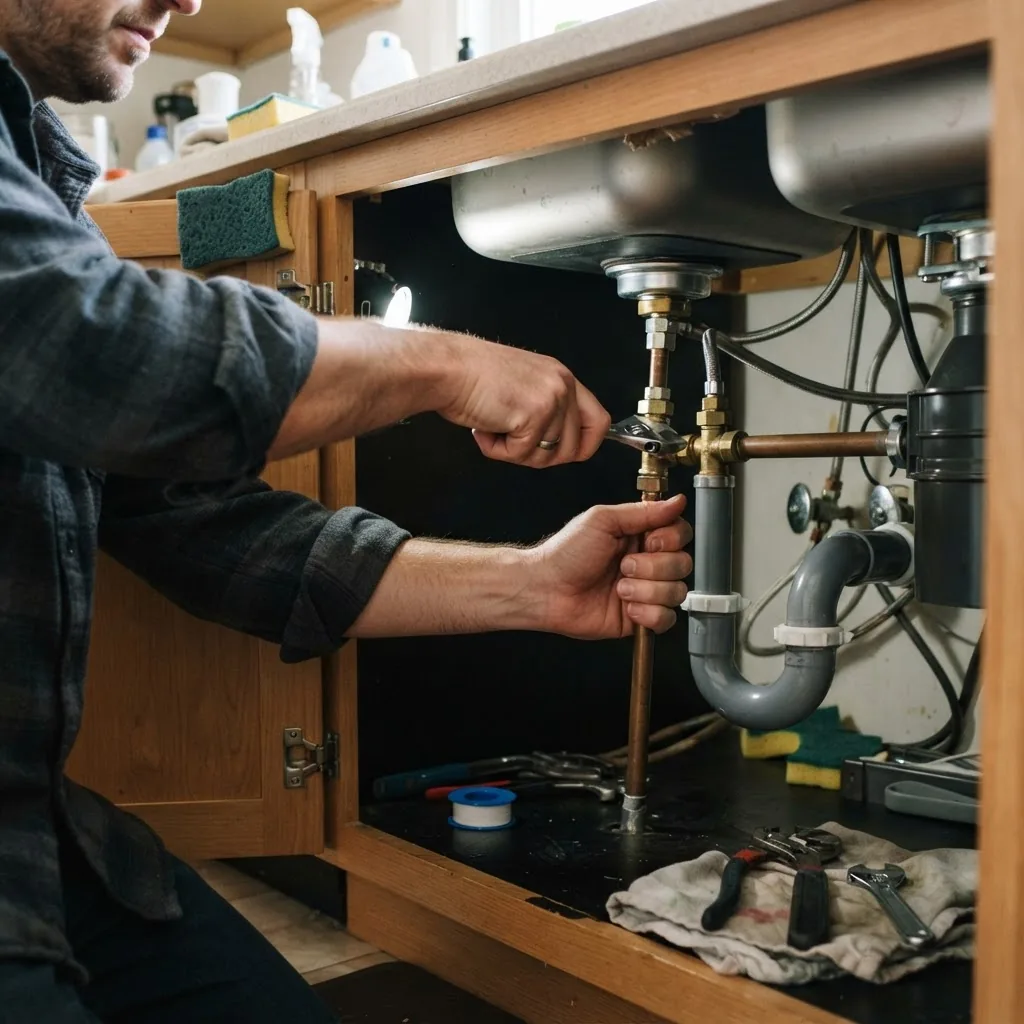
- Unclog slow drains: use a plunger first (cup plunger for sinks). If that fails, remove the P-trap beneath sink: place a bucket, loosen slip nuts, clear trap of debris, reassemble with new washers if needed. For hair or soap clogs, use a 6–8″ drain snake to pull material. Avoid chemical drain cleaners; they damage pipes.
- Fix a dripping faucet: shut off water at local valves, remove handle and cartridge/valve stem, replace O-rings or washer (standard 3/8″ and 1/4″ sizes common). Reassemble and check for leaks. Replacing a washer typically takes 10–20 minutes with a $5–$15 part.
- Repair minor pipe leaks: if a threaded joint leaks, tighten with wrench; if pinhole leaks appear on copper, shut off water, drain pipe, clean area, and apply self-fusing silicone tape or pipe repair clamp as a temporary fix. Permanent repair often requires soldering or replacing the section—call a licensed plumber if you lack experience.
- Address low water pressure: check aerators and showerheads for mineral buildup—soak in vinegar for 30–60 minutes. Test water pressure at the main supply: under 40 psi may indicate supply issues; consult your water utility or a plumber.
- Water heater leaks and temperature issues: check the pressure relief valve and drain pan. Sediment buildup causes noisy tanks and reduced capacity—flush the tank annually by draining 10–20% until clear water runs. If pilot light or ignition fails on gas models, follow manufacturer steps; if unsure, call a pro.
- Detect hidden leaks: monitor your water meter with all fixtures off; if the meter moves, isolate fixtures to find leak location. Use a moisture meter in ceilings and walls to find concealed damp spots. Early detection prevents mold and structural damage.
DIY vs professional: DIY for unclogging drains, replacing washers/aerators, and basic trap work. Call a licensed plumber for repiping, major leaks, sewer backups, water heater gas controls, or if repairs require opening walls.
affordable handyman services can be a cost-effective option for recurring issues like seasonal gutter clearing or drain checks.
-
HVAC Common Problems and Easy Fixes
HVAC systems lose efficiency through clogged filters, thermostat miscalibration, and duct leaks. Routine maintenance keeps performance high and energy bills lower—compare the system to a car that needs oil changes.
- Replace air filters monthly or quarterly: replace 1″ fiberglass filters every 30–90 days; pleated MERV 8–11 filters typically every 90 days. For homes with pets or allergies, change every 30–45 days. Mark replacement dates on the filter frame.
- Check thermostat settings and calibration: verify setpoint vs actual room temperature with an infrared thermometer. If off by more than 2°F, recalibrate or replace the thermostat. For programmable and smart thermostats, confirm schedules and battery levels.
- Inspect ductwork for leaks: visually inspect exposed ducts for loose joints and seal with mastic or UL-181 foil tape (do not use cloth-backed duct tape). If ducts lose more than 15% of airflow, consider professional balancing.
- Clear condensate drain lines: for air handlers, flush the condensate line with 1 cup of white vinegar monthly to prevent blockages. If overflow trips the float switch, locate and clear the blockage immediately to prevent water damage.
- Clean outdoor condenser: shut power at the disconnect, remove debris, and hose off fins from the inside out. Keep 2–3 ft clearance around unit. Straighten bent fins with a fin comb.
- Routine professional tune-up: have a technician inspect refrigerant charge, belts, motors, and electrical connections annually. According to a 2023 trade association guideline, annual tune-ups extend HVAC lifespan by 10–15%.
Use maintenance templates to keep tasks scheduled and logged.
maintenance schedule templates help you track filter changes, service dates, and emergency contacts.
When to call a pro: compressor failure, refrigerant recharge, strange burning smells, or gas furnace ignition problems. Always turn off power to the unit before attempting internal checks.
-
Electrical System Faults and Safety Repairs
Electrical faults range from tripped breakers to dangerous wiring problems. Treat electricity with respect; small mistakes can be lethal. Keep an outlet tester and multimeter on hand for basic troubleshooting.
- Test and reset breakers: if a circuit trips, unplug devices, reset the breaker by fully switching off then on. If it trips again immediately, isolate the problem circuit and call an electrician. Label breakers clearly after diagnosis.
- Replace faulty outlets and switches: shut off power at the breaker and confirm with a multimeter. Replace cracked outlets or switches; for tamper-resistant or GFCI requirements near water, upgrade to GFCI/AFCI devices per local code. If wiring is aluminum or knob-and-tube, contact a licensed electrician immediately.
- Address flickering lights: test bulbs and fixtures; if flicker affects multiple fixtures on the same circuit, loose neutral or overloaded circuit may be the cause—call a pro.
- Upgrade aging panels: panels older than 25–30 years with fuses or known overheating issues should be inspected. According to a 2022 electrical safety report, outdated panels are a leading cause of residential electrical fires.
- Safety precautions: always de-energize circuits, use insulated tools, and never work on live wiring without training. For code references, consult OSHA and your local building code office for required permits.
home improvement online resources list vetted tutorials and contractor directories—use them to verify credentials before hiring.
When to call a pro: any wiring replacement, main panel work, persistent arcing, or overloaded circuits. Licensed electricians carry insurance, follow the National Electrical Code, and pull necessary permits.
-
Water Heater and Hot Water Supply Troubleshooting
Water heaters fail gradually (sediment, reduced capacity) or suddenly (leaks). Regular flushing and monitoring extend service life.
- Check temperature settings: set tank thermostats to 120°F (49°C) to balance scald prevention and energy efficiency. Use an infrared thermometer at tap output to verify.
- Flush tank to remove sediment: shut off power/gas, attach hose to drain valve, open valve and drain 10–20% until water runs clear. For heavy sediment, repeat until clear—do this annually on direct-buried or hard-water systems.
- Test the pressure relief valve (TPR): lift the valve lever briefly; water should discharge and stop when released. Replace valve if it leaks continuously. Use a bucket to avoid spills.
- Address temperature inconsistencies: check thermostats on dual-element electric tanks and ensure both elements are working (use multimeter). For gas models, relight pilot per manual; if flame is yellow or irregular, have a technician inspect the burner.
- Repair small leaks: if you find a leak at a connection, tighten the fitting slightly and apply plumber’s tape. Leaks at the tank shell indicate internal failure—replace the water heater.
When to call a pro: gas control valve replacement, major leaks, or no hot water with power/gas on. For safety, a licensed plumber or HVAC tech should handle gas shutoff and burner adjustments.
-
Structural and Foundation Issues with Repair Recommendations
Foundation and structural problems can be costly; recognizing early warning signs avoids severe repairs. Look for horizontal cracks, stair-step mortar cracks, door/frame separation, and uneven floors.
- Inspect for common warning signs: hairline vertical cracks under 1/4″ are often non-structural; horizontal cracks, cracks wider than 3/8″, or cracks with displacement indicate serious movement. Note water pooling near foundation and interior wall bowing.
- Address drainage first: ensure ground slopes away from foundation 6″ within the first 10 feet; extend downspouts 3–6 ft away from foundation. Correcting grading and gutters often halts further deterioration.
- Repair minor cracks: for hairline cracks use polyurethane or epoxy injections; for vertical cracks under 1/4″, tuck-point mortar can be used in masonry. Use a bonding agent and follow manufacturer cure times (24–48 hours).
- Do’s and don’ts: do monitor cracks monthly and photograph for changes; don’t jackhammer or attempt underpinning yourself—those are structural interventions requiring an engineer.
- When to call a pro: visible foundation settlement, wall bowing, stair-step cracks, or utilities affected. For readers preparing to sell, see guidance on repairing key home issues before selling to prioritize repairs that protect sale value.
Case example: a homeowner noticed a 1/2″ horizontal crack in a basement wall and water staining; after grading was corrected and a French drain installed by a contractor, movement stopped and interior repairs were limited to epoxy injections—contractor work prevented a $15,000 underpinning in later years.
-
Mold, Mildew, and Moisture Control Solutions
Mold grows where moisture lingers. Controlling humidity, fixing leaks, and deep cleaning remove the environment mold needs to thrive.
- Inspect for mold hotspots: check basements, crawlspaces, bathrooms, and behind appliances after leaks. Use a moisture meter: readings above 18% in wood require action.
- Contain and remove small mold patches: for areas under 10 sq ft, wear N95 mask, gloves, and goggles; scrub non-porous surfaces with detergent and water, then apply a 1:10 bleach solution or commercial mold cleaner. Dry within 24–48 hours.
- Address source moisture: repair plumbing leaks, improve ventilation (install or repair exhaust fans that move 50–100 CFM), and use dehumidifiers to keep indoor RH under 50%.
- When to call remediation pros: for >10 sq ft of mold, HVAC contamination, or when mold is in porous materials (insulation, drywall), hire certified remediators. For standards and health guidance, consult the EPA at EPA: Mold.
detailed deep cleaning checklist and healthy homes assessment checklist are useful supplements for prevention.
Safety note: DIY mold cleaning is not suitable for HVAC contamination or large-scale infestations. Improper cleanup can spread spores; remediation pros use containment, HEPA filtration, and negative pressure protocols.
-
Gutter Problems and Maintenance Solutions
Clogged gutters cause water to back up into fascia and foundations. Maintain gutters seasonally to protect roofing, siding, and foundation.
- Clear gutters twice yearly: remove leaves and debris in spring and fall. Use a 5-gallon bucket and scoop; flush with a hose from the downspout end while checking for leaks.
- Inspect and tighten hangers: gutters should slope 1/4″ per 10 ft toward downspouts. Replace hangers every 2–3 years if rusted or loose.
- Repair holes and leaks: dry the area, apply roofing cement to small holes, and reinforce with an aluminum patch. For long runs with multiple holes, replace the section (snap-in sections commonly sold in 10 ft lengths).
- Downspout extension: ensure downspouts discharge 3–6 ft from foundation or into a drainage system—use 2″ diameter extensions and secure with screws.
printable home cleaning checklists make seasonal gutter tasks simple to track.
Impact: properly functioning gutters reduce basement leaks and protect siding; neglected gutters are a frequent cause of attic and ceiling water damage.
-
Door and Window Maintenance Issues and Fixes
Door and window seal failure causes drafts, moisture ingress, and energy loss. Weatherstripping and simple adjustments restore function in many cases.
- Identify drafts: use an infrared thermometer or hold a lit incense stick along edges. Replace worn weatherstripping (foam or V-strip) where air movement is detected. For windows, apply new silicone caulk to exterior seams—allow 24 hours to cure.
- Fix sticking or misaligned doors: tighten hinge screws; if frame is out of square, plane the edge by 1–3 mm at a time and refinish. Replace threshold seals if compressed beyond 1/8″.
- Repair cracked panes: for single-pane windows, replace glass with new tempered glass; for double-pane failures (fogging), replace the entire sealed unit to regain insulating properties.
- When to replace: if more than 25% of weatherstripping needs replacement or if windows are single-pane in cold climates and replacement payback period is under 10 years, upgrade to double-glazed units.
Quick tip: replace door sweeps every 3–5 years and caulk exterior joints when sealant shows cracks larger than 1/8″.
-
Pest Infestations: Common Types and Home Remedies
Pests—termites, rodents, ants, cockroaches—cause health problems and structural damage. Control combines sanitation, exclusion, and targeted treatments.
- Inspect and seal entry points: fill gaps >1/4″ with steel wool and caulk; install door sweeps and repair torn screens. Rodents can enter through holes as small as 1/2″.
- Remove attractants: store food in sealed containers, fix leaks, and eliminate standing water. Keep wood piles 20 ft from foundations.
- Use traps and baits: for rodents use snap traps in runs perpendicular to walls; for ants use bait stations placed near trails (not direct sprays, which repel). Follow label instructions for commercial pesticides.
- Termite inspections and treatment: visible mud tubes or damaged wood requires a licensed pest control operator. For prevention, maintain a 6″ clearance between soil and wood siding and avoid untreated wood in contact with soil.
- Natural remedies: diatomaceous earth in wall voids and boric acid baits (careful with pets and children) can reduce insect populations when used correctly.
When to call a pro: termite evidence, large rodent infestations, or situations requiring fumigation. Licensed pest control pros provide inspection reports useful for insurance and resale.
-
Exterior Paint and Siding Problems with Repair Advice
Peeling paint and damaged siding not only look bad but allow water intrusion. Timely patching and repainting preserve cladding life.
- Assess the substrate: remove loose paint with a scraper, sand to feather edges, and check underlying siding for rot—replace any soft wood greater than 6″ in length.
- Prime bare wood: use oil-based primer on bare wood spots; allow 24 hours to dry in 50–70°F. Apply exterior acrylic paint in two coats for durability.
- Repair siding cracks: for fiber cement or vinyl, replace the damaged board or use compatible patch kits; do not use standard caulk for structural gaps over 1/4″.
- Timing and conditions: paint when temperatures are between 50–85°F and humidity below 70%. Avoid direct sunlight on the surface when painting to prevent rapid drying and poor adhesion.
Pro tip: repaint exterior every 5–10 years depending on exposure and material; inspect annually for fast intervention.
-
Common Appliance Repairs and Troubleshooting Tips
Appliances break down but many early fixes are straightforward. Know when to order parts and when replacement is cheaper than repair.
- Refrigerator not cooling: clean condenser coils every 6 months (vacuum brush for 10–15 minutes), check door seals, and ensure condenser fan runs. If compressor hums but doesn’t cool, call a certified appliance technician.
- Washer or dryer failures: for washers, check inlet hoses and replace if bulging; run a diagnostic cycle per manual. For dryers, clean lint screen and vent hose monthly; if dryer overheats or tumbles slowly, inspect belt and motor.
- Oven or range problems: replace heating elements that show breaks; test electric elements for continuity with a multimeter (0 ohms indicates good continuity—open circuit suggests failure). For gas burners that won’t light, clean orifices and check ignition switch.
- Dishwasher not draining: remove bottom filter, clear debris, check drain hose for kinks, and test the drain pump by listening for humming—if pump fails, replacement part costs typically $60–$200.
DIY home repair projects resource covers basic appliance safety and part sourcing.
Repair vs replace guide: if an appliance is over 8–10 years old and repair cost exceeds 50% of replacement, replacement is often more energy-efficient and cost-effective.
-
Drainage and Water Management Problems at Home
Surface and subsurface drainage control protects foundations and landscaping. Proper grading, functional sump pumps, and French drains manage excess water.
- Identify pooling and erosion: after a storm, walk the property and note areas with standing water lasting more than 24 hours. Measure slope with a line level—less than 1/4″ per foot toward away from house needs correction.
- Maintain and test sump pumps: pour 5–10 gallons of water into the pit to trigger pump—listen for activation and verify discharge 10–20 ft away. Replace battery backup every 3–5 years and test monthly during wet seasons.
- Install or repair French drains: for chronic seepage, install a perforated pipe in a 6″–12″ gravel bed wrapped in filter fabric; grade to discharge outlet or storm drain. For shallow installations, excavation depth of 12–18″ is common.
- Landscape solutions: use swales to route water, plant deep-rooted perennials to reduce surface water, and avoid compacted soil in critical zones—loosen soil in problem areas to improve infiltration.
Emergency steps: during basement flooding, shut off electricity to the affected area at the main breaker (if safe), remove valuables, and call a water damage restoration professional if contamination is present.
-
Insulation Problems and Energy Efficiency Repairs
Insulation and air sealing reduce heat loss and lower bills. Look for gaps, compressed insulation, and missing attic baffles.
- Inspect attic insulation depth: measure depth; cellulose should be 12–18″ depending on climate zone (R-38 to R-60 recommended in colder climates). Add loose-fill insulation to reach recommended R-values; use a knee pad and avoid stepping on rafters.
- Seal air leaks: locate leaks around chimneys, recessed lighting, and top plates using a smoke pencil or incense. Seal gaps up to 1/2″ with caulk; larger gaps use spray foam (expansion foam) in 1″ layers—do not overfill around chimneys.
- Improve wall insulation: for accessible crawlspaces, add batts with friction fit; for closed walls consider blown-in cellulose by a contractor. Air sealing prior to insulation can increase effectiveness by 10–20%.
- Consider professional upgrades: for whole-house insulation upgrades, professional installation provides consistent R-values and reduces risk of moisture traps. See projects that improve home upkeep and efficiency.
home maintenance projects for energy efficiency list targeted upgrades with expected payback periods.
Common mistakes and how to avoid them
I once attempted to patch a leaking flashing without checking the underlying decking; the patch failed within two months because rot was hidden beneath shingles. Now I always probe decking for softness and use a moisture meter before applying permanent flashing repairs. I also used chemical drain cleaners once and regretted it—now I use mechanical snakes or call a plumber when in doubt.
Compact checklist to verify your work
| Item | Verification |
|---|---|
| Roof | No missing shingles, flashing sealed, attic dry after next rain |
| Plumbing | No drips, drains clear within 30 seconds, water meter stationery with fixtures off |
| HVAC | Filters replaced, thermostat matches reading within 2°F |
| Electrical | Outlet tester shows correct wiring, breaker labels updated |
| Mold | Moisture under 18%, visible mold removed or remediated |
When to call a professional instead
- Structural movement, major foundation cracks, or collapsed elements.
- Any electrical work beyond outlet/switch replacement—panel work and wiring changes require a licensed electrician.
- Gas line, HVAC compressor, and combustion appliance repairs (for safety and permit reasons).
- Large mold remediation (>10 sq ft), sewer backups, and widespread water damage.
Final notes: follow manufacturer intervals for appliances and record all services for resale value and warranty. Routine maintenance is the difference between a few hours a year and expensive emergency repairs down the road.
If you found this guide useful, review the full checklist and related resources to turn these steps into a recurring program you can follow every season.