

diy home repair — By the end of this hands-on guide you’ll be able to complete eight reliable, beginner-friendly repairs (leaky faucet, drywall patch, door hinge replacement, minor electrical fixes, simple window stops, clogged trap clearing, basic caulking, and a small tile edge repair). Expect 1–6 hours total depending on how many projects you attempt; each project lists time and assumes a basic DIY skill level (able to use a screwdriver, wrench, and utility knife).
What you’ll achieve: practical, step-by-step skills to confidently perform small household repairs, save on routine costs, and extend the life of common fixtures without specialist tools.
Introduction to DIY Home Repair
This guide focuses on simple, small, and basic home fixes anyone can do safely. You’ll get clear instructions for easy home repairs and do it yourself house repairs that avoid specialized trades. These are everyday, approachable home improvement projects meant to empower homeowners to maintain and upgrade their homes regularly.
Why start with small repairs? Quick fixes prevent escalation: a hairline leak left unchecked can become a rotted subfloor or mold problem—both costly. The practical approach here balances speed and durability: short projects (15 minutes to 3 hours) with low-cost materials that produce long-lasting results when executed correctly.
This guide complements a broader maintenance routine — Complete Home Maintenance Checklist for Yearly and Monthly Care — and is written as a hands-on manual: clear prerequisites, step sequences, common mistakes from field experience, a verification checklist, and decisive guidance on when to call a pro.
Transition: Next we’ll list the essential tools and materials so you start each project with the right kit and safety gear.
Essential Tools and Materials for DIY Home Repairs
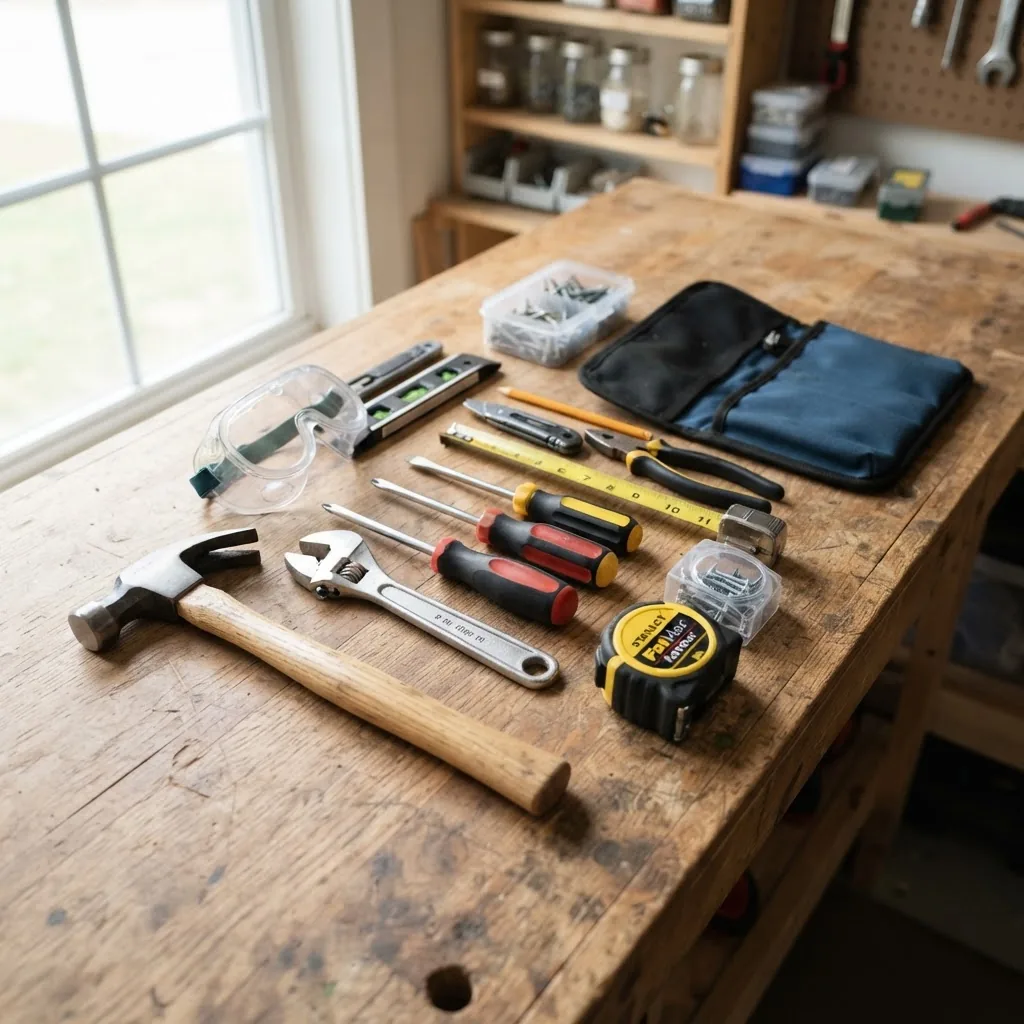
- Claw hammer (16 oz) — Use for nails, light demolition, and tapping trim into place. Choose one with a fiberglass or rubber grip for vibration dampening.
- Screwdriver set (flat + Phillips, sizes #0–#3) — Magnetic tips speed work and reduce stripped screws. A stubby screwdriver helps in tight spaces.
- Adjustable wrench (8–10″) and set of open-end wrenches — For plumbing nuts and small mechanical fixtures. Steel, chrome-plated recommended.
- Tape measure (25 ft) — Locking model with clear metric/imperial markings; measure twice, cut once rule applies to trim and caulking runs.
- Utility knife (with spare blades) — For trimming caulk, cutting drywall paper, or scoring tile. Keep extra blades sealed and change blades every 6–8 cuts to stay sharp.
- Cordless drill/driver (12–18V) — With a set of driver bits and a 1/4″ hex quick-change adapter. Use low torque for screw placement to avoid stripping wood or drywall.
- Stud finder and level — Electronic stud finders reduce guesswork for hanging hardware; a 24″ level fits most doorway and shelving tasks.
- Pliers (needle-nose and slip-joint) — For gripping, bending wire, and pulling staples or nails.
- Caulking gun — Use with silicone or acrylic latex caulk; a ratcheting gun gives cleaner control for long bead runs.
- Plunger and sink auger (3–6 ft mini) — For clear clogs; auger length depends on trap and P-trap access. Never force an auger past resistance.
- Sandpaper and sanding block (120 and 220 grit) — For smoothing drywall patches and painted trim before finishing.
- Putty knife set (1″, 4″, 6″) — For joint compound, spackling, and scraping old caulk.
- Safety gear: safety goggles, nitrile gloves, dust mask (N95), and ear protection — Wear when sanding, cutting, or using power tools; OSHA recommends eye protection for all home repairs.
- Basic materials kit — Include: multi-purpose caulk (white or clear), silicone caulk, 4 oz wood glue, coarse and fine spackling, 3” drywall screws, 2″ and 1¼” wood screws, assorted anchors (plastic and toggle), plumber’s tape (PTFE), a small tube of epoxy, and joint compound (setting-type 20–45 minute and premixed).
- Consumables and extras — Sanding sponges, painter’s tape (1″), disposable mixing cups, rags, small buckets, drop cloths.
- Recommended starter brands — DeWalt or Makita for drills (12–18V), Stanley tape measures, Klein Tools screwdrivers; for materials, DAP or 3M caulks and West System epoxy are reliable.
How to organize: keep a small toolbox kit for immediate tasks and a larger roll-up canvas for weekend projects. Label spare blades and anchors in small zip bags. According to a 2024 industry report on homeowner tool purchases, having a core toolkit reduces repair time by an average of 25% because you avoid searching for missing items.
Transition: With tools ready, the next section walks you through six to eight core projects step-by-step, with precise timings, materials, and troubleshooting notes.
Common Simple DIY Home Repair Projects Anyone Can Do
This section is the heart of the hands-on guide: step-by-step instructions for common home repair projects. Each project lists required tools, materials, expected time, difficulty (Beginner/Intermediate), and precise steps you can follow immediately.
-
1. Fixing a dripping compression-faucet (kitchen or bathroom)
Tools & materials: adjustable wrench, flat/Phillips screwdrivers, replacement O-rings and seat washer kit for your faucet model, plumber’s grease, PTFE tape. Time: 30–60 minutes. Difficulty: Beginner.
- Shut off water — Turn the local supply valves under sink clockwise until snug; if none, shut main house valve. Open faucet to drain remaining water (30–60 seconds).
- Remove handle — Pry off decorative cap, remove screw, lift handle. Keep parts in order on a towel (photograph if unsure).
- Unscrew packing nut — Use adjustable wrench; remove valve stem or cartridge depending on model. Note: cartridge systems often have retaining clips; keep them safe.
- Inspect and replace seals — Replace old O-rings and seat washers with exact-size replacements from the faucet kit. Coat O-rings lightly with plumber’s grease; do not over-lubricate.
- Reassemble and test — Reinstall stem, tighten packing nut snugly (do not overtighten), replace handle, and restore water. Operate faucet and check for drips for 5 minutes.
Troubleshoot: If dripping persists after replacing seals, the valve seat may be corroded — time for a replacement cartridge or professional help if corrosion is heavy.
-
2. Patching a small drywall hole (up to 6 inches)
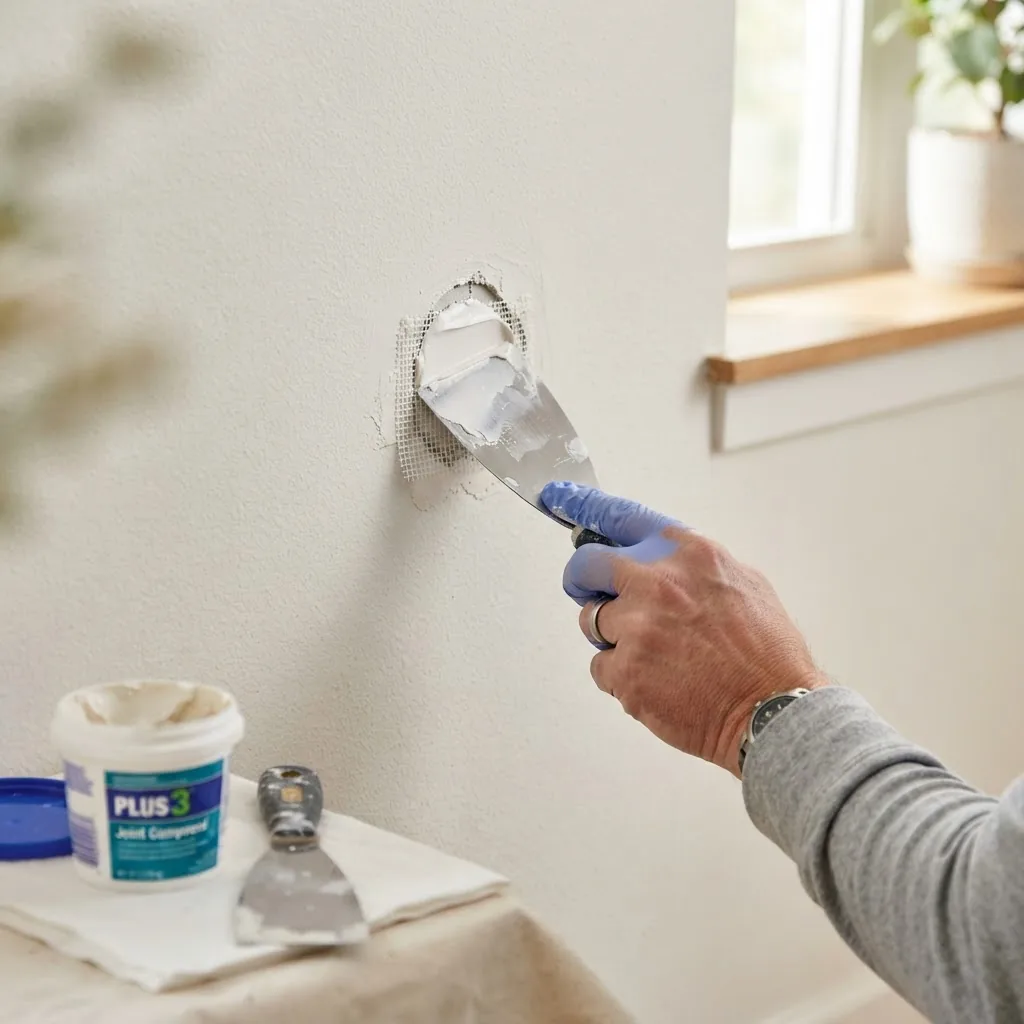
Tools & materials: utility knife, 6″ putty knife, 4″ drywall patch or mesh tape, setting-type joint compound (20–45 min) or lightweight spackle, sandpaper (120 & 220 grit), primer, matching paint. Time: 1–3 hours total with drying. Difficulty: Beginner–Intermediate.
- Clean and square the hole — Use a utility knife to cut the hole into a clean square/rectangle. Remove loose debris and dust.
- Fit patch — For holes under 6″, use a self-adhesive mesh patch or a pre-cut piece of 1/2″ drywall secured with adhesive. For a plaster base, use mesh tape plus setting compound.
- Apply first coat — Press mesh patch over hole. Use a 6″ putty knife to apply the setting joint compound in a thin layer, feathering 4–6″ beyond the patch. For setting-type, mix per package to a peanut-butter consistency.
- Let cure, sand, and repeat — After 20–45 minutes (setting compound) or overnight for premix, sand lightly with 120 grit, then apply a second, thinner coat to fully feather the edges. Final sand with 220 grit after full cure.
- Prime and paint — Apply stain-blocking primer to the patch area and paint with two coats for a uniform finish.
Notes: For textured walls, replicate texture before final paint using a spray texture or stipple brush while the second coat is tacky.
See also a wider set of problems in common home maintenance problems for related fixes and alternative patch methods.
-
3. Replacing a squeaky or misaligned door hinge
Tools & materials: screwdriver or drill with appropriate bits, replacement hinge (match leaf size and screw spacing), wood screws, wood filler (if old screw holes are loose). Time: 20–45 minutes. Difficulty: Beginner.
- Support the door — Place a 2×4 or wedge under the door near the hinge area to support weight before removing screws.
- Remove hinge screws — Remove bottom hinge screws first, then middle/top. Keep removed screws organized if reusing.
- Check mortise depth — If replacing with a thicker hinge, chisel shallow mortise or select same-thickness hinge to avoid altering door fit.
- Install new hinge — Fasten top hinge first into the jamb, then align leaf on door and insert screws. If screw holes are stripped, fill with wood glue and toothpicks or use longer screws that bite into fresh wood.
- Test swing — Open and close door several times, fine-tune screw tightness to remove binding without overtightening.
Time saver: Use a 2″ long screw in the top hinge into the frame to pull jamb tight; it significantly reduces sag (common trick used by carpenters).
-
4. Clearing a clogged sink trap (P-trap) and simple drain maintenance
Tools & materials: adjustable wrench, bucket, rubber gloves, plumber’s tape (PTFE), bottle brush or old toothbrush. Time: 20–45 minutes. Difficulty: Beginner.
- Place bucket under the trap — Catch water and debris. Never force the trap; you should unscrew slip nuts by hand or with an adjustable wrench gently.
- Loosen slip nuts — Rotate counterclockwise; hold trap steady while loosening to avoid stressing plastic fittings. Remove trap, clean out hair and gunk with a brush.
- Inspect and reassemble — Check washers for cracks; replace if worn. Reassemble finger-tight and then quarter-turn with the wrench. Wrap PTFE tape on threaded plastic fittings sparingly (usually not needed for slip joints).
- Test for leaks — Run water and inspect for drops for 5 minutes. Tighten gently if slow seepage appears.
Preventive tip: Monthly use of a drain strainer and quarterly flushing with hot water and a 1:1 mix of vinegar and baking soda reduces buildup.
-
5. Replacing a simple light switch or outlet (single-pole)
Tools & materials: voltage tester, flat/Phillips screwdriver, replacement switch or receptacle (match amperage 15A/20A), wire strippers, electrical tape. Time: 20–40 minutes. Difficulty: Beginner–Intermediate.
- Shut off power — Turn off the circuit breaker feeding the switch/outlet and verify with a non-contact voltage tester on the device and nearby wires. According to a 2024 safety guideline from recognized sources, always verify power is off before touching wires.
- Remove cover and device — Unscrew cover plate, then unscrew device from box. Pull device out to access wires.
- Test wires — Use the voltage tester on hot wires; confirm zero volts before proceeding. Label wire positions or photograph for reconnection.
- Replace and reconnect — Loosen terminal screws, remove wires, attach to new device in same configuration (hot to brass, neutral to silver on receptacles). Tighten screws to manufacturer torque guidance where available; wrap with electrical tape for extra safety if needed.
- Reassemble and test — Replace device, cover, restore breaker, and test operation. If the device sparks or trips the breaker, shut the breaker off and re-check wiring.
Warning: If wiring uses aluminum conductors, or the box is filled with multiple circuits, stop and call a professional — see the When to Call a Professional section for thresholds.
-
6. Resealing windows and exterior doors with caulk
Tools & materials: caulking gun, exterior-grade silicone or polyurethane caulk, 1″ painter’s tape, utility knife, rag, mineral spirits (for cleanup). Time: 45–90 minutes per door/window. Difficulty: Beginner.
- Remove old caulk — Score and pull away failed caulk with a utility knife or caulk remover tool. Clean surface of dirt and old adhesive residues; wipe with mineral spirits if necessary and let dry.
- Mask edges — Apply painter’s tape 1/8–1/4″ from the joint edges to keep bead straight.
- Apply caulk — Cut nozzle to a 3/16–1/4″ bead for most joints. Hold gun at 45°, apply constant pressure, moving steadily to lay a continuous bead. Tool with a wet finger or caulk tool within 5 minutes of application.
- Remove tape and cure — Remove tape before caulk skins (1–5 minutes depending on temperature). Allow full cure per product instructions (usually 24–48 hours).
Selection tip: Use 100% silicone for wet areas and polyurethane for paintable exterior joints. Expect a 10–15 year life for quality exterior caulk in moderate climates.
-
7. Replacing a cracked ceramic tile edge or reglazing a chipped tile
Tools & materials: grout saw, chisel and hammer, replacement tile or epoxy filler, thin-set adhesive, grout, small trowel, sponge. Time: 1.5–4 hours (depending on cure). Difficulty: Intermediate.
- Remove grout around damaged tile — Use a grout saw to clear joint around the tile to avoid damaging adjacent pieces.
- Break out tile carefully — Score surface, then use a chisel to remove tile fragments starting from the center outward; protect surrounding tiles with masking tape.
- Prepare substrate — Clean off thin-set residue until you reach a solid base. Apply new thin-set to adhere the replacement tile.
- Install tile and grout — Set tile, align with spacers, allow thin-set to cure (per manufacturer, often 24 hours), then grout and wipe off excess. Cure grout 24–48 hours before light use.
Quick fix: For a small chip, epoxy filler tinted to match glaze can restore appearance without full tile replacement for low-wear areas.
-
8. Tightening cabinet hardware and replacing drawer slides
Tools & materials: screwdriver, power drill with countersink bit, replacement slides (measure length), wood glue, clamps. Time: 30–90 minutes. Difficulty: Beginner–Intermediate.
- Inspect and tighten — Check door hinges, pulls, and drawer screws. Tighten loose screws; if holes strip, remove screw and inject wood glue with toothpicks, let set 30 minutes, then re-screw.
- Replace drawer slides — Remove drawer, measure slide length and mounting type (side-mount or under-mount). Install new slides per template, typically 3–4 screws per side. Reinstall drawer and test slide movement.
- Adjust alignment — Most slides have adjustment screws to center the drawer; use them to achieve even gaps and smooth operation.
Practical note: Many IKEA-style drawers use simple cam fittings; consult manufacturer guides for exact fasteners to avoid damage.
Transition: The following section covers essential safety protocols and a clear checklist to keep every project safe and compliant with basic standards.
Safety Tips and Precautions for DIY Home Repairs
- Always isolate energy sources: Turn off water at local valves and power at circuit breakers. Confirm with a voltage tester. According to a 2024 safety guideline from OSHA, verification of power is required before working on electrical devices.
- Use correct PPE: Eye protection, N95 dust mask for sanding, nitrile gloves for chemical handling, and ear protection for loud power tools. Keep a first-aid kit nearby.
- Work with adequate lighting and ventilation: Avoid enclosed spaces with volatile adhesives; run fans or open windows and use low-VOC products where possible.
- Follow manufacturer instructions: Read product labels for cure times, load ratings, and torque specs for fasteners. For tool safety, consult the tool manual or the manufacturer’s online resources (for example, manufacturers and Home Depot DIY resources explain tool-specific guides).
- Avoid makeshift supports: Use a ladder of rated height and weight capacity; never stand on chairs. For heavy doors or cabinets, use proper jacks or a helper.
- Know personal limits: If a repair involves structural changes, gas lines, major electrical rewiring, or asbestos/lead-containing materials, stop and call licensed professionals.
Safety checklist before starting a repair:
- Power and water isolation verified with testers.
- PPE available and used (goggles, mask, gloves, ear protection).
- Fire extinguisher within reach for tasks involving heat or soldering.
- Work area cleared of trip hazards, pets, and children.
- Material SDS reviewed for any chemicals (adhesives, solvents).
External references for safety standards: US Consumer Product Safety Commission, Home Depot DIY resources, and OSHA guidelines on home repair safety offer up-to-date protective protocols and tool safety practices.
Transition: Knowing safety boundaries, the next section offers practical tips to save time and money while keeping repairs effective and energy-efficient.
DIY Home Improvement Tips to Save Time and Money
Small, strategic projects can reduce utility bills, prevent costly damage, and streamline future upkeep. The following practical tips include examples and quick wins a homeowner can implement within a weekend.
- Prioritize preventive fixes: Replace worn weatherstripping around doors and windows—cost: $10–$40 per door; time: 20–40 minutes. This reduces drafts and can lower heating/cooling costs by 5–10% for drafty homes (According to a 2024 industry report on home efficiency improvements).
- Bundle similar tasks: Schedule painting, caulking, and trim repairs together so you set up drop cloths once and finish multiple tasks in one weekend — saves setup time (usually 30–60 minutes per room) and material waste.
- Use multi-use materials: A quality acrylic latex caulk is paintable and suitable for many interior joints; choose products that cover several uses to reduce leftover product waste.
- Buy consumables in small bulk: Purchase screws, anchors, and blades in packs for ~20–30% lower per-item cost; rotate spares into a labelled bin to avoid emergency trips to the store.
- Energy-efficient fixes: Swap incandescent or halogen bulbs for LED equivalents; estimate: $2–$6 per bulb, payback in months for frequently used fixtures. Seal attic access and insulate recessed can lights (with rated covers) to stop heat flow.
- Learn a few multipurpose techniques: Mastering one drywall patch and one faucet repair yields a disproportionate return: these two skills alone resolve common problems that otherwise generate hundreds in service calls.
- Use templates and jigs: Make a simple cardboard template for repetitive holes (e.g., door latch strike plates) to speed consistent placement and reduce wasted material.
- Document repairs: Photograph before/after and note date, product, and model numbers in a maintenance log. This reduces repeat diagnostic time and makes warranty claims easier.
- Leverage grants and rebates: For energy upgrades (LED retrofits, weatherization), search local utility rebates which can lower project cost substantially.
- Plan seasonal projects: Do exterior caulking and gutter checks in spring; interior painting and cabinet touch-ups in fall to avoid humidity and temperature extremes during curing.
Project example: replacing weatherstripping on an entry door. Materials: $15 for adhesive-backed foam or sweep, time: ~30 minutes, expected draft reduction: 20–40% at thresholds, payback: a single winter season in many climates.
For recommended projects that streamline upkeep and reduce labor over time, see home maintenance projects.
Transition: If a repair grows beyond the defined limits here, the next section shows how to decide between DIY and hiring a professional, with a quick comparison you can use immediately.
When to Call a Professional: Limits of DIY Repairs
DIY is best for small-scale, low-risk tasks. You should call a licensed contractor for work that affects structure, gas, or major electrical systems, or when permits are required. Below is a practical comparison to help you decide.

| DIY Suitable | Professional Recommended | Why hire a pro |
|---|---|---|
| Patching drywall, faucet O-ring changes, tightening hinges, caulking, changing fixtures | Structural changes, full rewire, gas-line modification, roof replacement, complex plumbing (main sewer line) | Safety risks, permits, code compliance, insurance implications, specialized equipment |
| Replacing single switches or outlets in a simple branch circuit | Multi-circuit panels, aluminum wiring, adding circuits, service panel work | Complex diagnostics, fire risk, NEC compliance, licensed electrical testing |
| Cleaning P-traps, replacing faucet cartridges, tiling small areas | Sewer backups, burst mains, extensive water damage or mold | Health hazards, need for specialized remediation, insurance documentation |
Advisory points:
- Permits and code: Structural alterations, electrical panel changes, and major plumbing typically require permits. Unpermitted work can create liability when selling a home.
- Insurance considerations: If a DIY repair leads to damage (e.g., flooded bathroom), your homeowner policy may question workmanship — document steps and retain receipts.
- Complex diagnostics: If multiple systems fail, or an intermittent problem eludes step-by-step fixes, a licensed pro can run tests (camera sewer inspection, thermal imaging) not available to most homeowners.
If you decide you need professional help for sale-related or safety-critical work, see specific guidance on what to repair before selling a home. For low-cost ongoing help, consider handyman subscription services as an alternative.
Transition: Even after a successful DIY repair, regular maintenance preserves results. The next section gives a concise upkeep checklist and seasonal actions to maximize repair longevity.
Maintaining Your DIY Repairs for Long-Lasting Results
Ongoing care takes small time investments but prevents rework. The following numbered checklist sets a schedule and explains how to maintain each repair for durability.
- Monthly: visual inspection — Walk through key rooms and check for new drips, loose hardware, cracked caulk edges, and tile grout gaps. Spend 15–30 minutes. Record findings in your maintenance log.
- Quarterly: functional checks — Test shut-off valves, operate all windows and exterior doors, run one full cycle of dishwasher and washing machine. Replace worn weatherstripping and re-caulk failed joints. Time: 1–2 hours.
- Semi-annual: drain and filter care — Clean gutters (spring/fall), clear washing machine lint traps, and flush hot water heater per manufacturer instructions. Budget 2–4 hours for outdoor work.
- Annual: thorough inspection — Check roof, attic, insulation, HVAC filters, and exposed plumbing for corrosion or leaks. Consider a seasonal tune-up for heating/cooling systems. Time: 3–6 hours or hire an inspection professional for a detailed assessment.
- Immediate post-repair checks — After any repair, recheck for leaks or movement after 24 hours, 72 hours, and one week to catch slow failures early.
- Record and schedule maintenance — Use a simple calendar or a maintenance schedule template to track tasks and reminders; it reduces repeat repairs and coordinates seasonal projects.
To help organize these tasks, consult a structured maintenance inspection checklist and the deep cleaning house checklist when planning seasonal upkeep. Use the maintenance schedule template to set reminders and track warranties.
Transition: The hands-on portion concludes with common practitioner mistakes and a verification checklist you can use right now.
Hands-On Common Mistakes and How to Avoid Them
I’ve seen these failures on the job and at homeowners’ projects; here are candid examples and fixes.
I once overtightened a faucet packing nut and cracked the valve stem plastic — the fix cost more time and money than if I had used the correct size wrench and tightened incrementally. Now I always snug by feel and test before final torque.
Another time I applied paint over an unprimed drywall patch; the finish looked blotchy. I now always use primer specifically rated for joint compound and wait full cure time (24–48 hours for premix) before painting.
Finally, I learned that reusing stripped screws in jambs causes sagging doors. My habit now is to use longer screws that reach framing or to repair holes with wood glue and matchstick reinforcement before reinstalling hardware.
Verification Checklist: Confirm Your Repair Is Solid
- Visual: No visible gaps, drips, or cracks around the repair area.
- Functional: Fixture operates smoothly without noise, binding, or leaks for 72 hours.
- Durability: Screws and fasteners remain tight after two cycles of use (open/close, run water twice).
- Finish: Paint and caulk match surrounding areas; primer used where required.
- Documentation: Date, materials, and any part numbers logged in your maintenance record.
When to call a professional instead
If you encounter any of the following, stop DIY and hire a licensed contractor: suspected structural damage, persistent sewer backup, gas leaks (detectable odor or hissing), electrical panels or repeated breaker trips, discovery of asbestos or lead, or if local code requires a permit. For sale prep read more on what to repair before selling a home and for ongoing affordable help review handyman subscription services.
Final Practical Case Study
Case study: Alex, a first-time homeowner, fixed three items in one weekend: a dripping kitchen faucet (45 minutes), a 4″ drywall patch in the hallway (2 hours with drying), and re-caulked an exterior door (1 hour). Total out-of-pocket: $68 in materials and parts. The repairs prevented further water staining and reduced a draft at the door. Alex documented steps and used the maintenance log to schedule a recheck in 30 days.
Transition sentence to wrap up: you now have actionable repair skills, safety practices, and a maintenance plan to keep small problems small.
Conclusion
Key takeaways: start with the right tools, tackle small repairs systematically, verify isolations, document work, and maintain repairs seasonally. These simple home fixes — from faucet seals to drywall patches — save money and protect your home. Ready to take the next step? Use this guide alongside the Complete Home Maintenance Checklist for Yearly and Monthly Care to schedule and track tasks.
If a job looks bigger than described, call a licensed pro for safety and compliance. Otherwise grab your toolkit, follow the steps above, and start with a single 30–60 minute fix this weekend.