Hurricane damage repair — by the end of this guide you will be able to triage immediate hazards, perform a contractor-grade damage assessment, understand common repair methods, and estimate repair costs. Expect to spend 3–10 hours on initial assessment and planning, with construction timelines ranging from days (emergency work) to months (full structural repair); this guide assumes a homeowner with basic DIY experience and someone preparing to work with licensed contractors.
Before you start
- Permissions: verify emergency access and local evacuation status.
- Documents: photos of damage, insurance policy, property records.
- Protective gear and tools:
- Safety: hard hat, N95 respirator, heavy gloves, eye protection, steel-toe boots.
- Assessment: moisture meter, infrared thermal camera (rental OK), hygrometer.
- Emergency stabilization: 20×30 heavy-duty tarp(s), pressure-treated 1/2″ plywood sheets, staple gun, roofing nails, ratchet straps.
- Water removal/drying: submersible pump, 80–120 pint/day commercial dehumidifier, 2–4 axial air movers.
- Structural tools: adjustable shoring jacks, 2×4 bracing, impact drill, sawzall.
Before digging into step-by-step tasks, review the broader context for storm recovery in this article and the complementary storm damage restoration services.
Understanding Hurricane Damage: Types and Impact
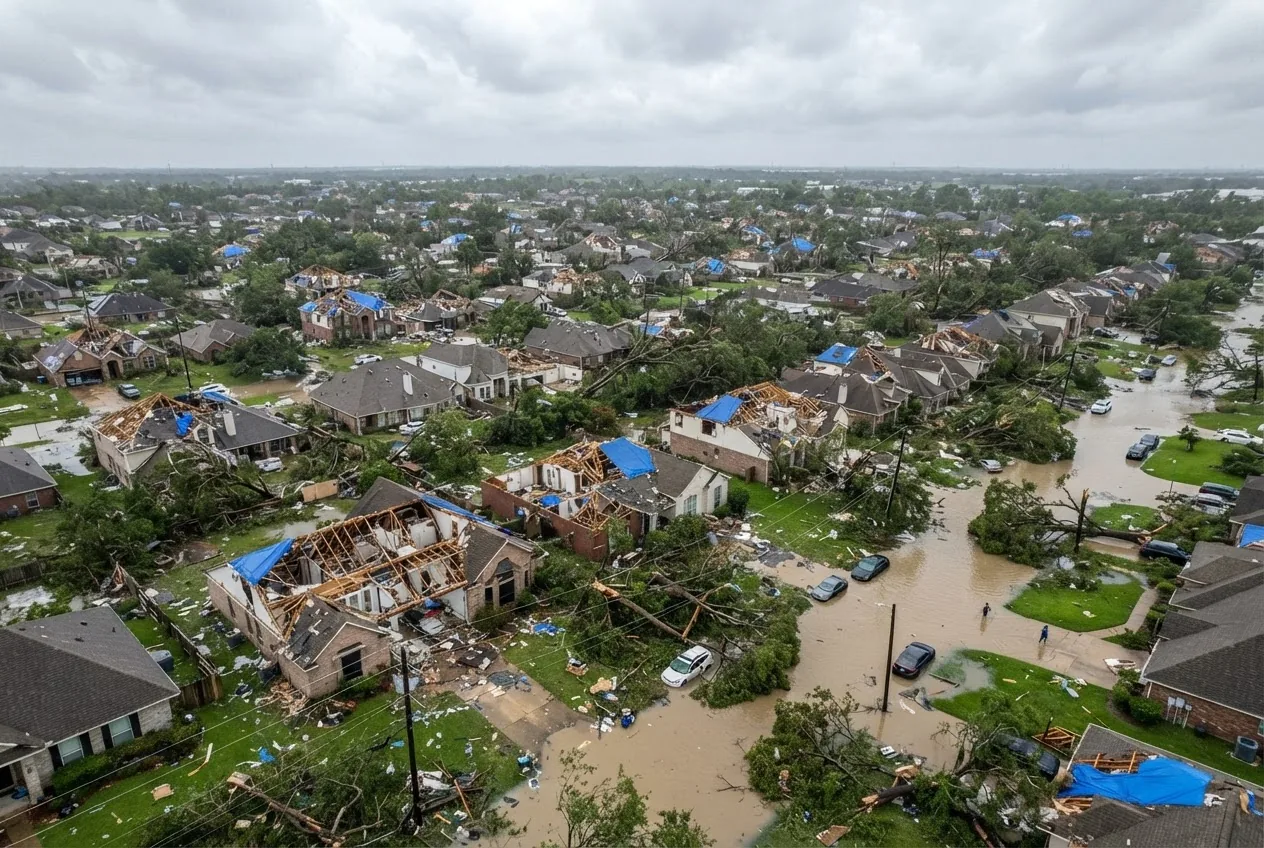
Hurricanes produce three dominant damage mechanisms: high-velocity wind damage, storm surge and heavy rainfall causing flooding and water intrusion, and airborne or water-borne debris impact. Each mode produces distinct repair needs — a roof ripped off by gusts requires different stabilization and replacement strategies than prolonged waterlogging from surge.
Typical examples:
- Wind damage: missing shingles, uplifted roof edges, broken soffit and fascia, damaged roof decking and sheathing. Wind can also twist and snap framed connections, causing rafter and truss displacement.
- Water intrusion / flooding effects: saturated insulation, warped subfloors, damaged drywall below the waterline, foundation and crawlspace inundation leading to efflorescence and soil washout.
- Debris impact: punctured roofing underlayment, broken windows, siding blows out, and mechanical damage to HVAC units and exterior utilities.
Structural compromise often follows a pattern: first the exterior envelope fails (roof, windows, doors), then water migration causes progressive failures in framing, sheathing, and interior finishes. Think of the process like medical triage—first stop bleeding (temporary weatherproofing), then evaluate for internal injuries (framing, moisture), then plan definitive surgery (rebuild or replace).
Damage severity indicators to note during an assessment:
- Visible sag or deflection in roof planes or ceilings (measure deflection in inches over span).
- Moisture meter readings: >20% moisture in wood indicates active saturation; 12–16% is borderline and needs drying.
- Unusual odors, visible mold growth, or efflorescence on masonry suggest prolonged water exposure.
According to a 2024 industry report, properties exposed to Category 3+ storms saw a higher probability of combined roof and water intrusion repairs compared with lower categories; prioritize roof stabilization to prevent compounding damage. For immediate safety regulatory guidance, consult FEMA.
Transitioning from understanding damage to acting: next we cover the emergency steps that preserve life, property, and insurance coverage.
Initial Emergency Response and Damage Assessment
The first 24–72 hours determine whether damage is stabilized or compounds. Follow these numbered steps like an emergency response checklist.
- Ensure personal safety and legal access. Confirm you and your household are safe. Do not enter structurally compromised areas. Photograph external damage from a safe distance; document time-stamped images for claims.
- Shut off utilities if unsafe. If there is standing water, smell of gas, or exposed wiring, shut off electricity and gas at the main if you can do so safely. Record meter readings and shutoff times.
- Perform a rapid external inspection. Note roof loss percentage (estimate to nearest 10%), major tree impacts, collapsed walls, and flood lines on walls. Use binoculars for roof surveys; only climb ladders with a helper and fall protection.
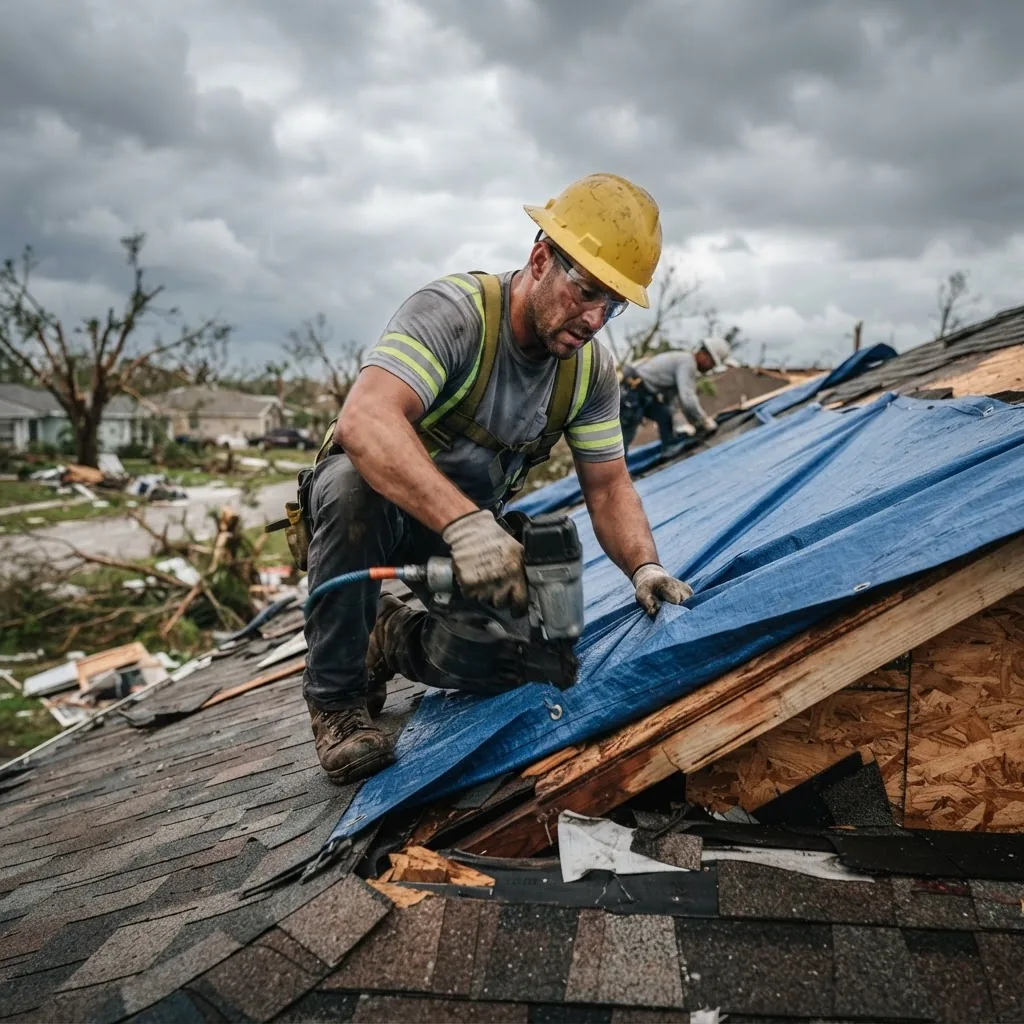
- Protect openings—board-up and tarping. Apply tarps over exposed roof areas with 2×4 nailers and roofing nails or straps; cover broken windows with 1/2″ pressure-treated plywood cut to size. This emergency board-up minimizes further water intrusion. Contractors offering emergency board-up are trained in standardized techniques to avoid creating new leaks.
- Extract water and begin controlled drying if safe. Remove standing water via pumps; set up air movers and a dehumidifier as soon as power or generator is available. For Category 3/contaminated water, use PPE and call professionals; see the flood cleanup guide.
- Document and file an insurance claim within 72 hours. Photograph every area, keep receipts for emergency purchases (tarps, pumps, lodging). Request an adjuster inspection and ask for the adjuster’s claim number and contact information.
- Perform a prioritized damage inspection checklist. Contractors use a checklist: roof envelope, attic inspection for sheathing rot, wall cavity moisture checks, HVAC status, electrical panel condition, plumbing integrity. Record moisture meter and IR camera readings for attic and wall cavities.
- Assess immediate structural hazards. If you detect floor-to-ceiling cracks, leaning walls, or sagging beams, evacuate and contact licensed structural engineers or contractors immediately.
- Engage an emergency mitigation contractor when needed. If water intrusion affects living areas, call a water mitigation company for extraction and drying; see water mitigation company services.
- Plan for temporary living and security. Track costs for relocation and secure your property against looting or wildlife by boarding doors and windows and maintaining secure fencing if possible.
Practical measurement thresholds: record moisture meter readings weekly; aim to bring structural wood below 16% moisture within 72 hours of drying operations. If readings remain above 18% after 5 days, escalate to professional drying and possible material removal.
For basement-specific flooding due to hurricane surge, consult a specialized basement flood cleanup services resource.
After initial stabilization, you’ll need to understand the full range of repair services available and how specialists handle hurricane-specific problems.
Key Hurricane Damage Repair Services Explained
This section outlines the core trades and service types you will use during recovery and how hurricane-specific factors change typical repair methods. For the complete storm-context and pricing matrix see the storm damage restoration service guide and cost overview.
Roof repair and replacement
Scope: from patching localized shingle loss to full re-roof with new decking and hurricane straps. Hurricane repair specifics:
- Temporary tarping: use 6–8 mil contractor tarps, secure with 2×4 nailers or pneumatic cap nails — contractors commonly use “hot tarping” techniques where allowed to minimize uplift.
- Decking repair: replace rotted sheathing with 5/8″ OSB or plywood; sister trusses or rafters with #2 2x8s where deflection >1/2″.
- Fastening upgrades: install hurricane straps and ring-shank nails per local code; consider Class-A impact-resistant shingles or metal roofing for longevity.
For detailed roofing cost guidance, see roof repair services and costs.
Structural framing and stabilization
When hurricane winds compromise framing, methods include temporary shoring, sistering joists, and partial replacement of load-bearing walls. Tools and materials: adjustable steel props (jack posts), engineered lumber, metal connectors, and epoxy injection for hairline cracks when applicable. A licensed structural engineer should sign off on load-bearing repairs—retain reports in your insurance file.
Water mitigation and controlled drying
Water removal differs when hurricane surge introduces contaminated (Category 3) water versus clean rainwater. Typical process: extraction → antimicrobial treatment → setup of air movers and dehumidifiers → continuous moisture monitoring. Methods include:
- Injectidry or cavity drying for wall cavities (low-pressure air injection).
- Use of commercial dehumidifiers rated 80–120 pints/day paired with axial air movers to reach target indoor relative humidity (RH) of 30–50% and reduce wood moisture to <16% within 72 hours.
For training or focused flooring concerns such as soaked carpets, consult carpet water damage repair and for large-scale water expertise see commercial water damage repair services.
Mold prevention and remediation
Mold becomes likely when structural materials remain above 16–18% moisture for more than 48–72 hours. Remediation approaches:
- Remove wet porous materials (insulation, drywall below the waterline, carpet pad).
- HEPA vacuuming, antimicrobial spraying, and containment for >10 sq ft of visible mold per many state protocols.
- Use of moisture meters and hygrometers to validate dryness; document readings for claims.
Further details on mold and water are available at water damage and mold remediation.
Debris removal, demolition, and contents recovery
Debris removal follows safety protocols for hazardous materials and often requires roll-off dumpsters and certified disposal. For personal belongings: inventory, document, and either pack-out to a restoration facility or dry/clean onsite. See personal property restoration services.
Mechanical systems repairs (HVAC, plumbing, electrical)
Hurricane water often damages HVAC units, electrical panels, and plumbing. Replace flooded HVAC systems and inspect electrical panels for corrosion. Licensed trades must reconnect gas lines and electrical service; do not DIY high-voltage or gas work.
Specialty services: pipe burst and commercial considerations
Low-temperature or surge conditions can cause pipe burst. For pipe-related hurricane damage consult pipe burst damage restoration. For commercial-scale projects, see commercial storm damage restoration and commercial water damage repair services.
Related technical resources
For detailed hands-on repair training and trade certifications related to carpentry and restoration, review damage restoration services requirements and repairing water damage guide.
Next we break down costs with a clear comparison so you can budget and plan negotiations with insurers and contractors.
Cost Breakdown for Hurricane Damage Repair Services
Repair costs vary by region, severity, and access. Below is a representative comparison table showing average price ranges and primary cost drivers. All cost ranges are illustrative; verify with local contractors and your insurer. According to a 2024 industry report, labor and material shortages can increase costs by 10–25% in major post-storm markets.
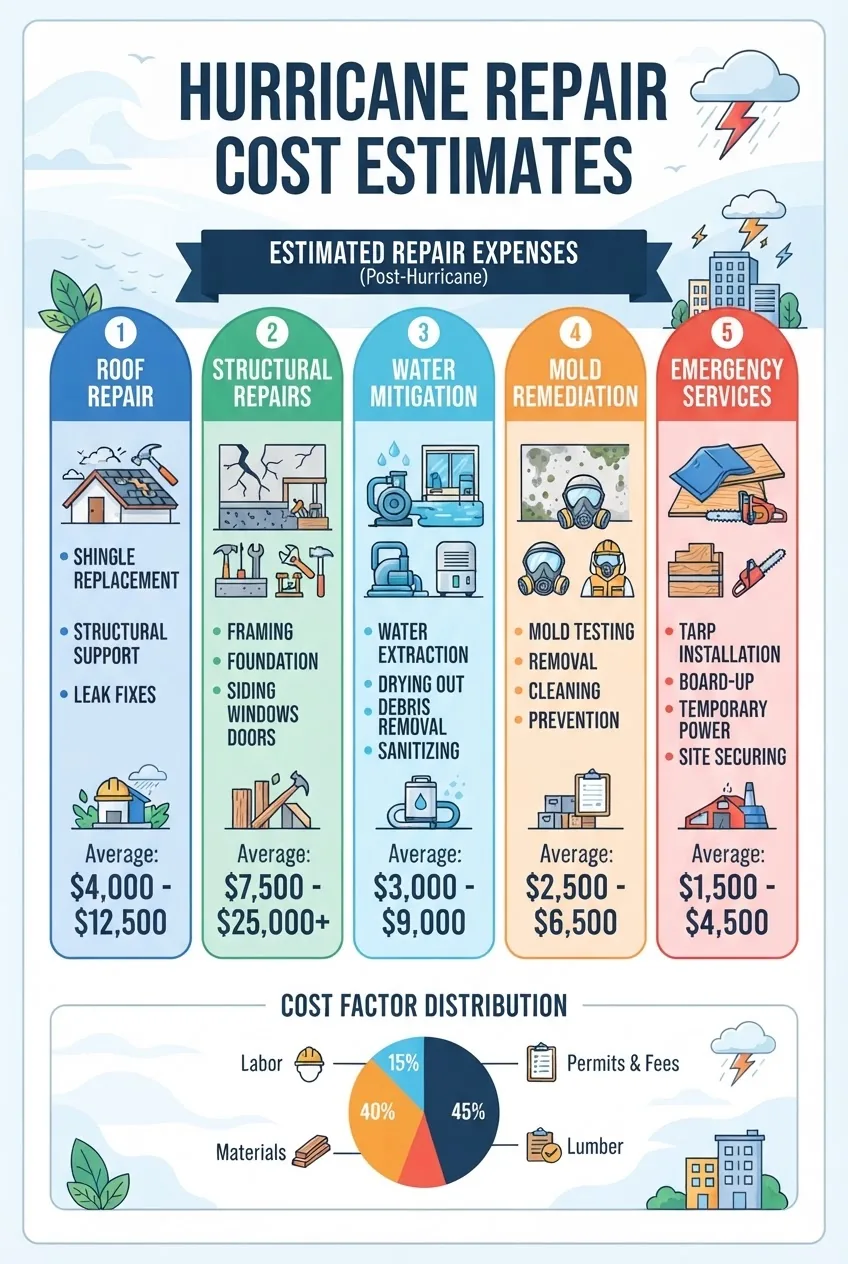
| Service | Typical cost range | Primary cost drivers |
|---|---|---|
| Emergency board-up & tarping | $200–$2,000 | Materials (tarps, plywood), access, call-out fees |
| Roof repair (localized) | $500–$5,000 | Extent of decking replacement, shingles vs. metal |
| Full roof replacement | $5,000–$30,000+ | Material choice, pitch, tear-off vs overlay, permits |
| Structural repairs (framing) | $2,000–$50,000 | Load path repairs, engineered plans, foundation work |
| Water mitigation & drying | $1,000–$10,000 | Affected sqft, equipment rental days, contamination level |
| Mold remediation | $500–$15,000 | Surface area, containment, HVAC cleaning |
| Contents restoration / pack-out | $500–$20,000 | Volume of items, specialty cleaning, storage days |
| Permits and inspections | $100–$5,000 | Local codes, plan reviews, third-party inspections |
Cost factors explained:
- Labor rates: skilled labor in hurricane-affected regions often rises 15–40% due to demand and overtime.
- Material choice: impact-resistant shingles, metal roofing, or engineered lumber raise upfront costs but reduce future risk.
- Permits and inspections: local building codes may require full re-roof permits and engineered drawings for load-path repairs—budget for permit fees and plan review time.
- Insurance coverage: wind vs flood coverage differ; flood losses often fall under separate flood policies or FEMA assistance. Review claim standards from the National Association of Insurance Commissioners.
If you need commercial-scale cost context, compare with commercial storm damage restoration.
Disclaimer: repair costs and timelines vary by region, contractor availability, and permit delays; use local estimates for budgeting and always include a 10–25% contingency. For FEMA disaster assistance rules, verify eligibility and documentation with FEMA.
Next: how to choose contractors who can deliver compliant, durable hurricane repairs.
Choosing the Right Hurricane Damage Repair Contractor
Selecting the right contractor protects your investment and your insurance claim. Use this practitioner checklist when evaluating candidates.
Checklist for vetting contractors:
- Verify licensing and active insurance (general liability and workers’ comp). Ask for policy numbers and call insurers to confirm coverage limits.
- Request three local references for comparable hurricane work completed within the last 24 months.
- Confirm certifications: IICRC (for water and mold work), roofing manufacturer certifications, and state-licensed trades where required.
- Require a written contract with scope of work, materials list, schedule, payment schedule, and a clear warranty term.
- Insist on lien releases and mutual holdbacks for final payments until permits are closed and inspections pass.
Helpful negotiation points:
- Split payments by milestones (emergency stabilization, structural, finishes).
- Ask for manufacturer warranties in writing for new roofing or siding materials.
- Include specification for hurricane-resistant upgrades if you intend to elevate resilience (e.g., straps, impact glass).
Training and certification matters. For carpentry and structural skills, confirm credentials related to carpentry repair certification. Also consider contractors with fire and water damage restoration certification for complex remediation.
Red flags:
- Demanding full payment upfront.
- Highly discounted quotes without written scope.
- No local references or inability to produce insurance verification.
When evaluating contractors for broader storm repair options, compare service offerings with the guide to storm restoration companies and consult the general storm damage repair contractors checklist.
Next we outline typical repair phases and realistic timelines.
Storm Damage Recovery Timeline: What to Expect
Recovery moves through discrete phases—emergency stabilization, mitigation, repairs, and final inspections. Below is a numbered timeline with typical durations; local permit and insurance processes will lengthen these windows.
- Emergency stabilization (0–3 days): Board-up, tarping, temporary shoring, initial water extraction. Priority is life-safety and preventing further interior damage.
- Assessment and documentation (1–7 days): Full contractor and adjuster inspections, moisture mapping, and scoping of work. Collect signed scopes and adjuster reports.
- Mitigation and drying (2–14 days): Continuous pumping, drying, and antimicrobial treatments. Equipment often runs 3–10 days depending on square footage and contamination.
- Structural repairs and permitting (1–8 weeks): Framing repairs, engineered fixes, permit processing. Simple local permits: 1–2 weeks; complex structural permits: 3–8 weeks.
- Envelope repairs (2–6 weeks): Roof replacement, window/door replacement, siding. Weather windows and lead times for materials (metal panels, impact windows) may extend timeline.
- Interior reconstruction (2–12 weeks): Drywall, flooring, finishes, mechanical reconnections, and painting.
- Final inspections and closeout (1–3 weeks): Building department inspections, final insurer walkthrough, and permit sign-off.
Permitting and inspections are common schedule drivers. For local building code requirements and hurricane-resistant standards, consult the International Code Council at ICC.
If any stage uncovers hidden damage (e.g., mold behind walls, foundation undermining), plan an additional 1–6 weeks. Always maintain a contingency budget for scope creep.
Next: preventative upgrades to reduce future hurricane repair needs.
Preventative Upgrades and Maintenance Post-Repair
After repairs, strategic upgrades can reduce future hurricane repair costs and insurance premiums. Here are durable, cost-effective options:
- Roof reinforcements: Install hurricane straps, ring-shank fasteners, and consider a secondary water barrier (peel-and-stick) underlayment. Upgrade to impact-rated shingles or standing-seam metal roofing.
- Windows and openings: Fit impact-resistant windows or install removable/rolling storm shutters. Reinforce garage doors to meet wind-load ratings.
- Siding and cladding: Use fiber-cement or reinforced panels with stainless steel fasteners to resist wind-borne debris.
- Site grading and drainage: Regrade to move water away from the foundation, install check valves on sewer lines, and elevate mechanicals if feasible.
- Regular maintenance: Inspect roof seals and flashing annually, trim trees within 15 feet of structures, and maintain gutter systems to handle heavy rainfall.
For finishing and cosmetic work like repainting after repairs, reference handyman paint services and schedule paint within 30–90 days of repair completion to protect exposed surfaces.
Consider cost vs. durability trade-offs: impact windows and metal roofing can cost 2–4× standard options but substantially lower expected future repair frequency and insurance exposure.
Maintain a cyclical maintenance plan; for exterior work and ongoing care see outdoor home repair and exterior maintenance.
Common mistakes and how to avoid them
I once observed homeowners sign a full roof replacement contract with a non-local crew who took a large deposit and then failed to secure required permits—this led to stopped work orders and doubled costs. Always verify local license, insurance, and permit plans before paying deposits.
Another frequent error is removing wet materials too early without documenting moisture levels. I’ve seen contractors discard wet drywall before recording measurements, which complicates insurance claims. Always photograph and record moisture meter readings before demolition.
Finally, homeowners sometimes rely only on temporary tarps for months; I’ve seen prolonged tarping allow insect and secondary mold issues. Arrange definitive repairs within the permit and insurance timeline, and rotate temporary protection if definitive repairs are delayed beyond 14 days.
Step-by-step practitioner checklist
- Document damage: time-stamped photos of all damage areas, interior and exterior.
- Emergency stabilize: board-up, tarp roof openings (use 6–8 mil tarp + 2×4 nailer), set up temporary power if needed.
- Call insurer: file claim, provide documentation, request adjuster visit within 72 hours.
- Engage mitigation: set pumps, remove standing water, run dehumidifiers, and monitor moisture daily.
- Obtain three bids: for major repairs, get three licensed quotes and verify references.
- Secure permits: contractor pulls required permits; keep copies of applications and inspections.
- Track costs: retain all receipts and change orders; obtain lien waivers after each payment.
- Final inspection: pass building inspections, close permits, get final engineer sign-off if required.
When to call a professional
Call licensed professionals immediately if you observe structural deflection, persistent moisture (>18% wood readings after 72 hours of drying), contaminated floodwater (sewage/Category 3), gas smell, or electrical sparking. For complicated claims or disputes, hire a public adjuster for representation.
For specialized basement issues contact basement flood cleanup services and for large pack-out restoration see personal property restoration services.
Final notes and next steps
Document everything, insist on licensed trades, and plan upgrades to reduce repeat damage. Keep a file with photos, moisture readings, contractor contracts, permits, and permit closeout documents for future reference.
Conclusion
Effective hurricane damage repair starts with immediate stabilization, accurate documentation, and choosing contractors who understand hurricane-specific techniques and codes. Use this guide to triage, estimate costs, and manage repairs; when in doubt, prioritize safety and call licensed professionals. Ready to start? Gather your photos and reports, file your claim, and schedule emergency stabilization within 24–48 hours.
Call to action: If you need an immediate contractor referral or help documenting damage for insurance, print this checklist and share it with your adjuster and chosen contractor.